Planning a Flowering Elbow Workshop
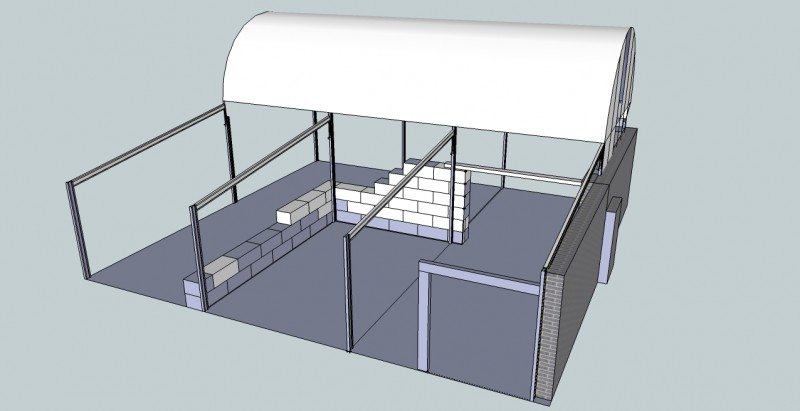
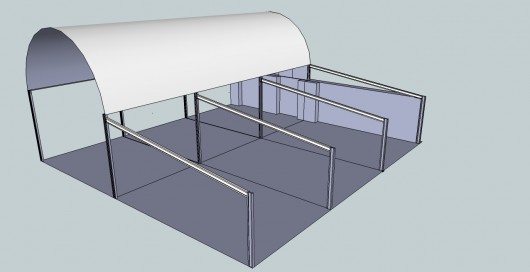
It is based on the Golden Hill Centre site near Carmarthen – a big set of farm outbuilding conversions, which amongst other things, houses an art gallery, hypnotherapy clinic, and IT training rooms. The workshop itself is going to be situated behind these buildings in a big old Dutch Barn. We can’t afford to put a proper floor in the whole lot, or keep such a big space warm in the winter, so most of it will be left open, for storage and super dirty sanding/welding jobs. Bay one and two (mouse-over above to see which ones are which) of the lean-to bit will be our nice insulated workshop area. Bay three has an old sheep dip, which we are planning to keep (minus the horrible liquid!). Cars and other vehicles can drive over it, and if you get down into it, it becomes a useful underside inspection/work area.
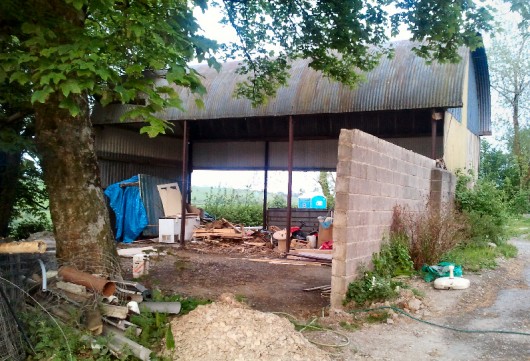
A few weeks ago this barn was a very leaky wood store, and a dumping ground for random farm junk, builder’s rubbish left over from other Golden Hill Centre building work, and stuff that I have been carefully saving (like a bunch of reclaimed teak bench-tops) for the workshop-to-be – that stuff is all under a tarpaulin to stop it getting soaked.
The agriculturally classic corrugated roof is getting patched up. The guys doing the work on the lean to have a telehandler, which is super useful for this kind of thing.
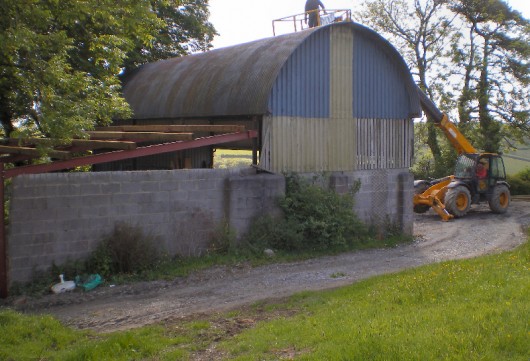
The roof of the lean-to, which is going to be over the workshop proper, needed completely renewing anyway, so that’s having a fairly substantial upgrade to some insulated sheets, with one long strip of translucent insulated fiberglass in each bay to add a good bit of natural light to the shop. It will be partitioned off from the rest of the barn with a straw bale infill wall. Though they have their drawbacks, namely they need to be kept dry throughout the build, straw bales are a nice environmentally friendly and cheap way to build a well insulated, structurally sound wall.
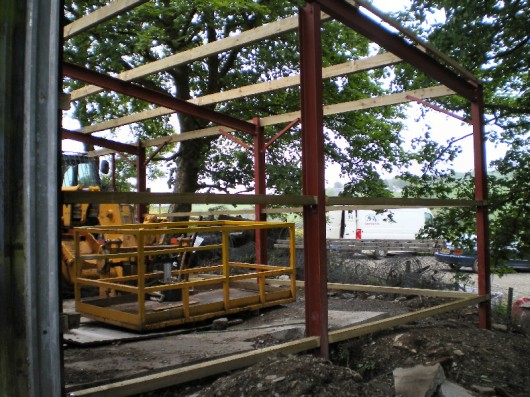
Below is a photo of the current situation, we have the stations of the lean-to in place and the purlins on. There is a bit of an issue with an old patio door we want to install to allow another access point, and some more light. And more importantly we are debating (getting confused by) the floor slab options…
So plenty left to do with this, stay tuned for the progress:
- Further research on concrete and alternatives for floor slab (rebar reinforced, or polypropylene fibre, or both)
- Finish ‘bale plan’, double check figures and measurements, and source the right quantity of straw bales
- Recruit helpers and build straw bale infill walls to enclose the lean-to workshop, plaster and finish (any takers?).
- Make/devise some kind of large opening/doorway leading through to the rest of the barn, that is reasonably insulated, but big enough to let in a vehicle and allow for reasonable ventilation when required
- Devise a workshop plan, what machines are going to go where, etc.
- Reconsider lighting and electrics plan
- Wire up and fit electrics
- Make some organised storage systems
- Clear up mess
- Start populating with exciting machines, tools and projects :D
Big changes afoot then, we are also planning an update to the website to reflect new possibilities. Don’t worry we’ll still keep on blogging, but also organising events and other great things that utilise this embryonic space.
| Tweet |
June 18th, 2011 at 9:46 am
This is fascinating and I look forward to seeing how the work progresses!
So, do you actually own this space? I wouldn’t have thought that you’d easily be allowed to do all this work if you were renting but then, I don’t really know…
June 18th, 2011 at 2:44 pm
Hay Olly, good to hear from you.
Yeah, it is based on my parent’s farm/The Golden Hill Centre, so not too many restrictions…
The roof is on and we have just finished a mad epic of putting the floor down, so will have to get a post up about that at some point. Cheers, B.
July 30th, 2011 at 12:41 am
Oh come on your little floor is no big deal. This is when it starts getting bad:
http://www.krwa.net/images/formoso/skreet.jpg
That truss beam on the right is called a power skreet and it just keeps on coming and coming. Some of the worst pours I’ve ever been on have involved such devices.
Anyhow so far your shop is looking good. Keep it up.
August 5th, 2011 at 9:42 pm
Thanks for the encouragement Paul. That Skreet looks like it does a good job – quite epic.
August 6th, 2011 at 5:45 pm
Does a good job of keeping a dozen masons out of work and laborers working hard. When will we see an update of your workshop project? This is the last thing I did in mine:
http://i.imgur.com/c5xvu.jpg
Isn’t much but every little bit helps I guess.
August 6th, 2011 at 5:55 pm
Nice tablesaw. Shouldn’t be tool long before another update ;) We have just fitted some reclaimed sliding doors at the moment…
August 6th, 2011 at 7:36 pm
You like it? I picked it up for $20 at a garage sale. Picture you saw was sort of the last one of it all. Here are some more pictures of it:
As found:
http://i.imgur.com/jjOer.jpg
had this for it:
http://i.imgur.com/8bjDS.jpg
cleaned it up:
http://i.imgur.com/HTJWC.jpg
made this:
http://i.imgur.com/q0cnC.jpg
http://i.imgur.com/JpnK1.jpg
all together:
http://i.imgur.com/avkT1.jpg
set it up:
http://i.imgur.com/8opNh.jpg
http://i.imgur.com/Hn2nu.jpg
got it to a point:
http://i.imgur.com/QWdQ7.jpg
did some more to it:
http://i.imgur.com/VannV.jpg
http://i.imgur.com/8Kypk.jpg
Finally finished:
http://i.imgur.com/c5xvu.jpg
Well, until I can think of something else to do to it. This also happened towards the end of all of that:
http://i.imgur.com/zJsf6.jpg
Not so sure how related it is but due to proximity I throw it in there with all the rest of it I guess. This is all vaguely related too I suppose:
http://img294.imageshack.us/img294/2234/fenceside.jpg
http://i.imgur.com/vylgY.jpg
http://img19.imageshack.us/img19/453/camq.jpg
http://img175.imageshack.us/img175/8803/auxfence.jpg
http://img178.imageshack.us/img178/2884/newshoptop.jpg
A fence I made. Now I need to make another one of them maybe. It is somewhat confusing because both saws I have are similar to one and another. Hope you enjoyed it all.
August 6th, 2011 at 8:17 pm
OOO, nice job with that… Thanks for sharing.
August 6th, 2011 at 9:21 pm
Thanks. Glad you liked it. I haven’t done much with the new one yet but this is one thing I did with the old one:
http://img195.imageshack.us/img195/2033/shelfy.jpg
Made two:
http://img9.imageshack.us/img9/508/shelves.jpg
made this too:
http://i.imgur.com/uAEbE.jpg
Out feed tables make table saws more useful for me.
With your picture on the bottom of your page you should get a kick out of this:
http://img191.imageshack.us/img191/1184/headstock.jpg
http://img143.imageshack.us/img143/4736/pict0105y.jpg
http://i.imgur.com/M3x9o.jpg
Part of which used to be this:
http://i.imgur.com/V5mzn.jpg
I ended up using that old head stock as a grinder though so I had to remake it all.
http://i.imgur.com/w1a4G.jpg
which ended up here as a drill bit sharpener
http://i.imgur.com/nF8yR.jpg
I like these from there as well:
http://i.imgur.com/YztV0.jpg
http://i.imgur.com/RcLLI.jpg
this too
http://i.imgur.com/l4ldS.jpg
I do a bit of electronic and electrical work too from time to time. This was the latest of that:
http://i.imgur.com/bZyI8.jpg
http://i.imgur.com/icN2g.jpg
http://i.imgur.com/ZmoPu.jpg
Sometimes more than a bit:
http://img708.imageshack.us/img708/7615/p7100104.jpg
Ha ha!
http://img64.imageshack.us/img64/1937/pict0713.jpg
August 7th, 2011 at 8:13 am
Dude! That is one impressive looking grinding station you have… Looks like the electronics pics might be the beginnings of a CNC machine – am I close? Impressive stuff.
August 7th, 2011 at 5:35 pm
You like? Well then,
I have a few more grinders sprinkled around my garage that wouldn’t fit onto that one bench too well. Extras I guess. One I like sharpening my lawn tractor blades with.
http://i.imgur.com/SX3pn.jpg
Then there is this one from when I first made it in my old garage:
http://i.imgur.com/rC7Ts.jpg
The wheel is synthetic diamonds. You can see some of my other grinders in that picture too before I worked on them more. Same bench but I fixed it up some too.
They are stepper motor drivers I made. I still have not gotten around to hooking them up to do much yet. I need to get some metal stock so I can make a frame. I don’t like actually spending money so I’m sort of hoping I’ll just be in the right place at the right time to get some stock I can use. Until then here are some more pictures of the some drivers I’ve made then a couple videos of them too:
TB6560 board:
http://img695.imageshack.us/img695/5841/tb6560ahqa.png
http://img545.imageshack.us/img545/2833/tb6560ahqacr.png
http://img404.imageshack.us/img404/8343/tb6560board.jpg
http://img709.imageshack.us/img709/9816/tb6560boardb.jpg
http://img171.imageshack.us/img171/4999/001eii.jpg
SLA7026 board:
http://img849.imageshack.us/img849/5064/sla7026msch.png
http://img683.imageshack.us/img683/6498/stepproto1.jpg
http://img189.imageshack.us/img189/6572/stepproto1b.jpg
Same circuit rearranged:
http://img338.imageshack.us/img338/1538/pict0783o.jpg
http://img717.imageshack.us/img717/8530/pict0787a.jpg
Buffer board:
http://img11.imageshack.us/img11/1819/ppbb4sch.png
http://img717.imageshack.us/img717/567/ppbbr4brdr.png
http://img191.imageshack.us/img191/4185/ppbbpic1.jpg
I might as well include the regulated supply I built to power this too:
http://i.imgur.com/Jfcjn.jpg
http://img713.imageshack.us/img713/2244/pict0579s.jpg
http://img196.imageshack.us/img196/6414/pict0576h.jpg
You can adjust max current and vary the voltage. It’d be handy on anyone’s workbench. If you build it be careful though it is trickier than it looks. But it is pretty simple for what it does. Not my design, I found it someplace on the web. I also substituted other transistors for what is on the schematic. Obviously OK to do. Try to use all matched ones. For the big LT10A04 diode I used half of a back to back diode module I pulled out of a beat computer power supply. They’re rated for high amps. I think the one I used was good to 50 amps? The whole project was a junk box special of stuff I had lying around.
The unit is so powerful if I touch the output pins together they sort of stick and weld to each other a little. But it is fairly protected so it seems OK to do. I’ve made a lot of power supplies and I’d rate this one a winner.
Videos:
http://www.youtube.com/watch?v=GU2GaSMPxNI
http://www.youtube.com/watch?v=cgbeyNNBZ68
Gratuitous workbench shot:
http://img37.imageshack.us/img37/2038/003nfl.jpg
I’m a real bug for electronics sometimes.