A guide to two different ways to melt scrap aluminium and make a casting
It has been a while since I first melted bits of scrap aluminium and cast them into a shape. I have had some triumphs in my DIY experiments, but also plenty of learning experiences (read fails), so I wanted to share some of the lessons. The two main methods I have tried, are “Lost Foam” and “Green Sand” casting, and I should say upfront I’m a convert to “lost foam”. Lets talk about the advantages and disadvantages of each.
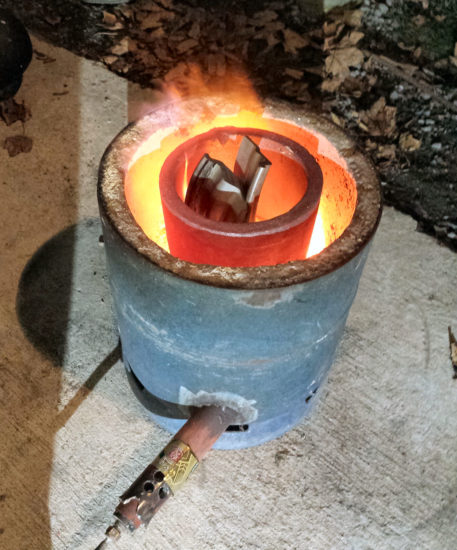
The DIY Propane furnace, lid off, melting some scrap aluminium.
Both methods involve heating up scrap aluminium in a DIY furnace until it melts, which is roughly 660oC, 1220oF. My furnace is made from an old steel gas bottle lined with home-made insulating refractory cement. It’s really quite rough and ready; made in the ‘Gingery’ lift out crucible style. It’s a simple and cheap furnace to make. To begin with I used charcoal as fuel and a stainless steel crucible – an old wine ice bucket we found in the trash. That lasted quite a while, but eventually burned through. The current setup has evolved to use a shop-made propane burner plugged into the same original furnace, and a big graphite crucible from e-bay.
Both methods involve making a “pattern”, in the shape of the finished part. The pattern is either a sacrificial foam shape that gets burned away by the aluminium, or a wooden shape that is used to create a hollow in the ‘green sand’.
Green Sand Casting
The ‘green sand’ in green sand casting isn’t really green, it is a mixture of bentonite clay, fine beach sand, and some water. It is used to form a mold into which is poured the molten aluminium. Making the green sand is quite simple, but time consuming. I used cat litter, which is a very cheap source of bentonite clay (also referred to as “Fullers Earth”). The cat litter does require grinding to make the clay fine enough to be evenly distributed in the sand. An old liquidiser does a good job here, as do scrap coffee grinders, either of which can usually be salvaged from trash if you keep your eyes open.
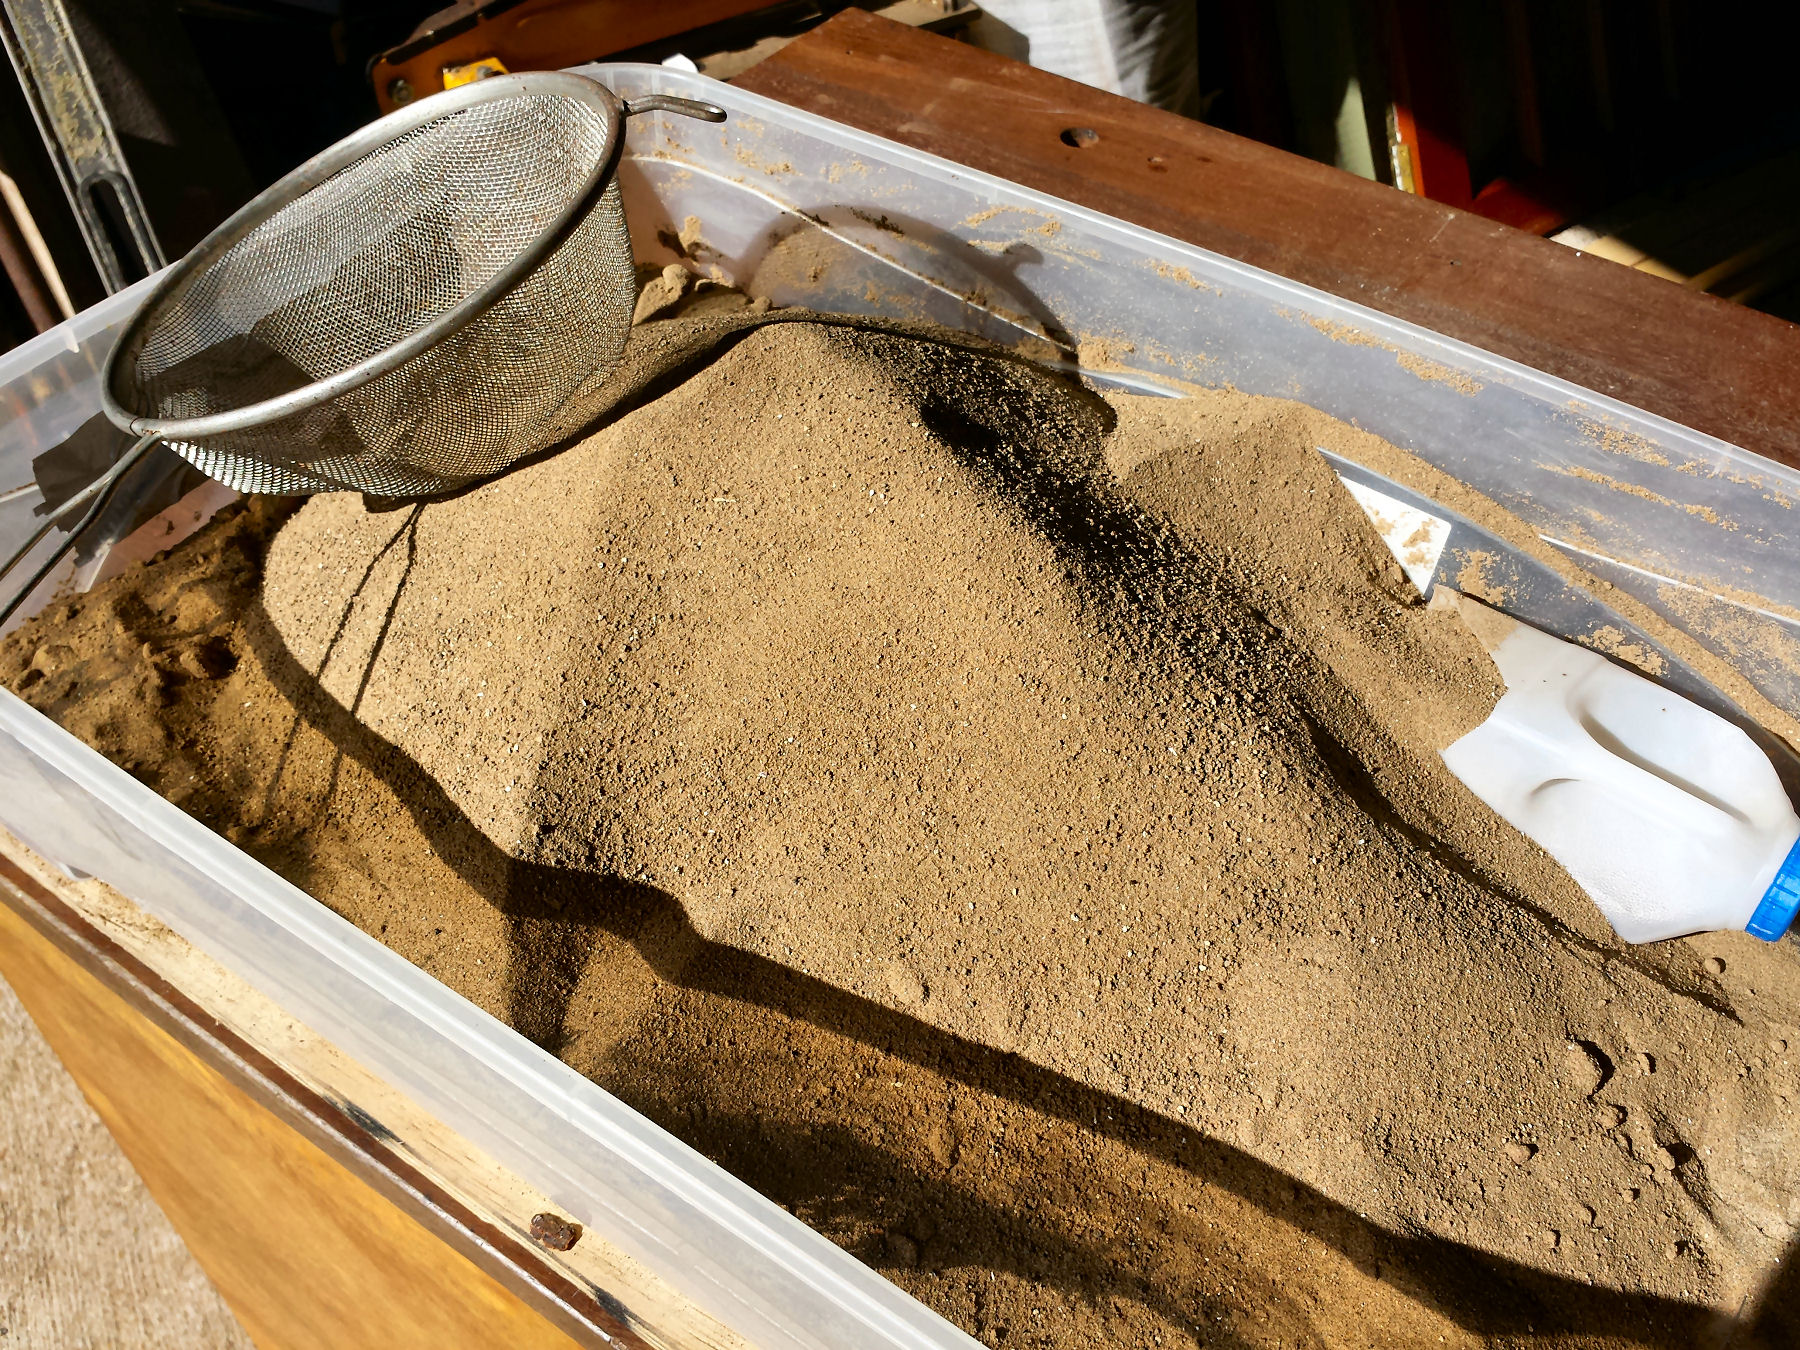
Green casting sand: 90 percent very fine beach sand, 10 percent bentonite clay.
Other things you will want to make green with sand are:
- a nice wide container to mix in. A mini sand pit type thing is ideal as the large surface area lets you add water more evenly, reducing mixing or ‘mulling’ time.
- a water mister. I use a pump action mister sold at garden centres for misting plants (comes in handy for plastering jobs, misting concrete, and settling dust too, so is quite a useful workshop item anyway).
Check out the little video to see how I make green sand.
Once you have your green sand, and have tested its consistency, before you can ‘ram up a flask’ (make the sand mold) you will need two other things: 1. The pattern, and 2. A flask.
Making a Pattern for Green Sand Casting
The pattern is essentially a duplicate of the part that you want to cast. Making a pattern for this method requires a bit more thought than lost foam. The two main additional considerations are draft angles and parting lines.
The draft angle is the angle you need to allow on the edges of the pattern so that you can actually pull it out of the sand. If, for example, you wanted to make a simple cuboid shaped pattern, you couldn’t make it a true rectangle. instead it would have to look more like so:
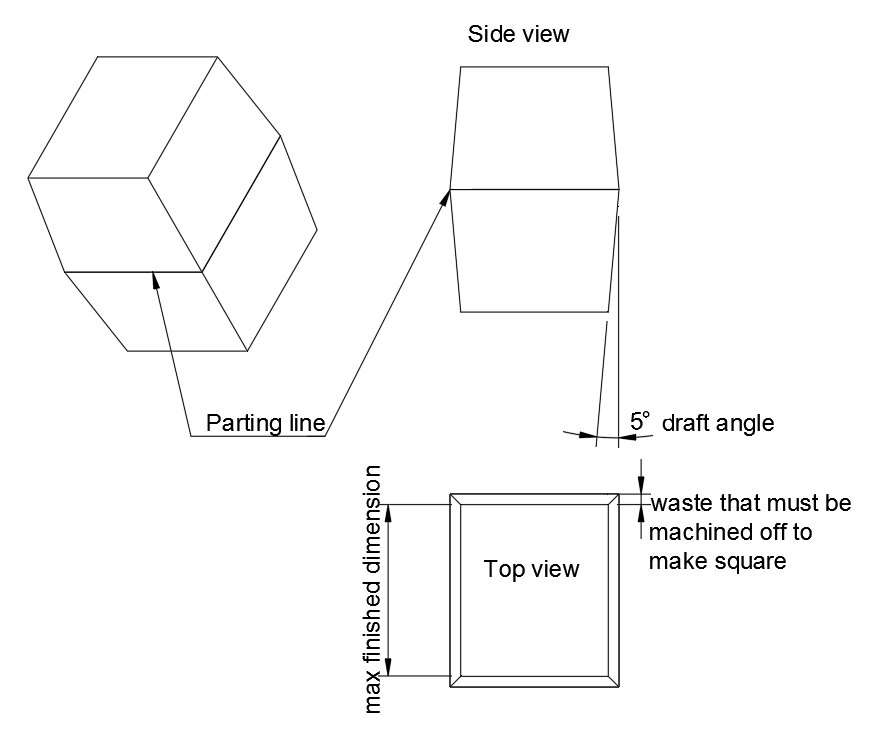
Rather than being square, the edges of the cuboid pattern must be ‘drafted’. 5 degrees is a common release angle.
Once you know about draft angle you start noticing it on almost any cast part you examine – it effects the way things look everywhere. The need for draft can be quite a pain and requires careful pre-planning to make sure the final part is the correct size, minus any milling, cutting or grinding you need to do to get the finished shape you actually want. Obviously on many parts this is not a problem, but it is something you need to keep in mind when deciding on both the design of your parts and which method you choose to cast with.
It is common practice to have a draft angle of about 5 degrees to allow a non-destructive release from the sand. This can be pushed to 3 and even 2 degrees but the surface finish on the pattern then needs to be absolutely excellent, and in my experience it’s still difficult with large parts. If the face of the part isn’t critical, and doesn’t need to be square, why not make it easy for yourself and chose a large draft angle like 10 degrees or so?
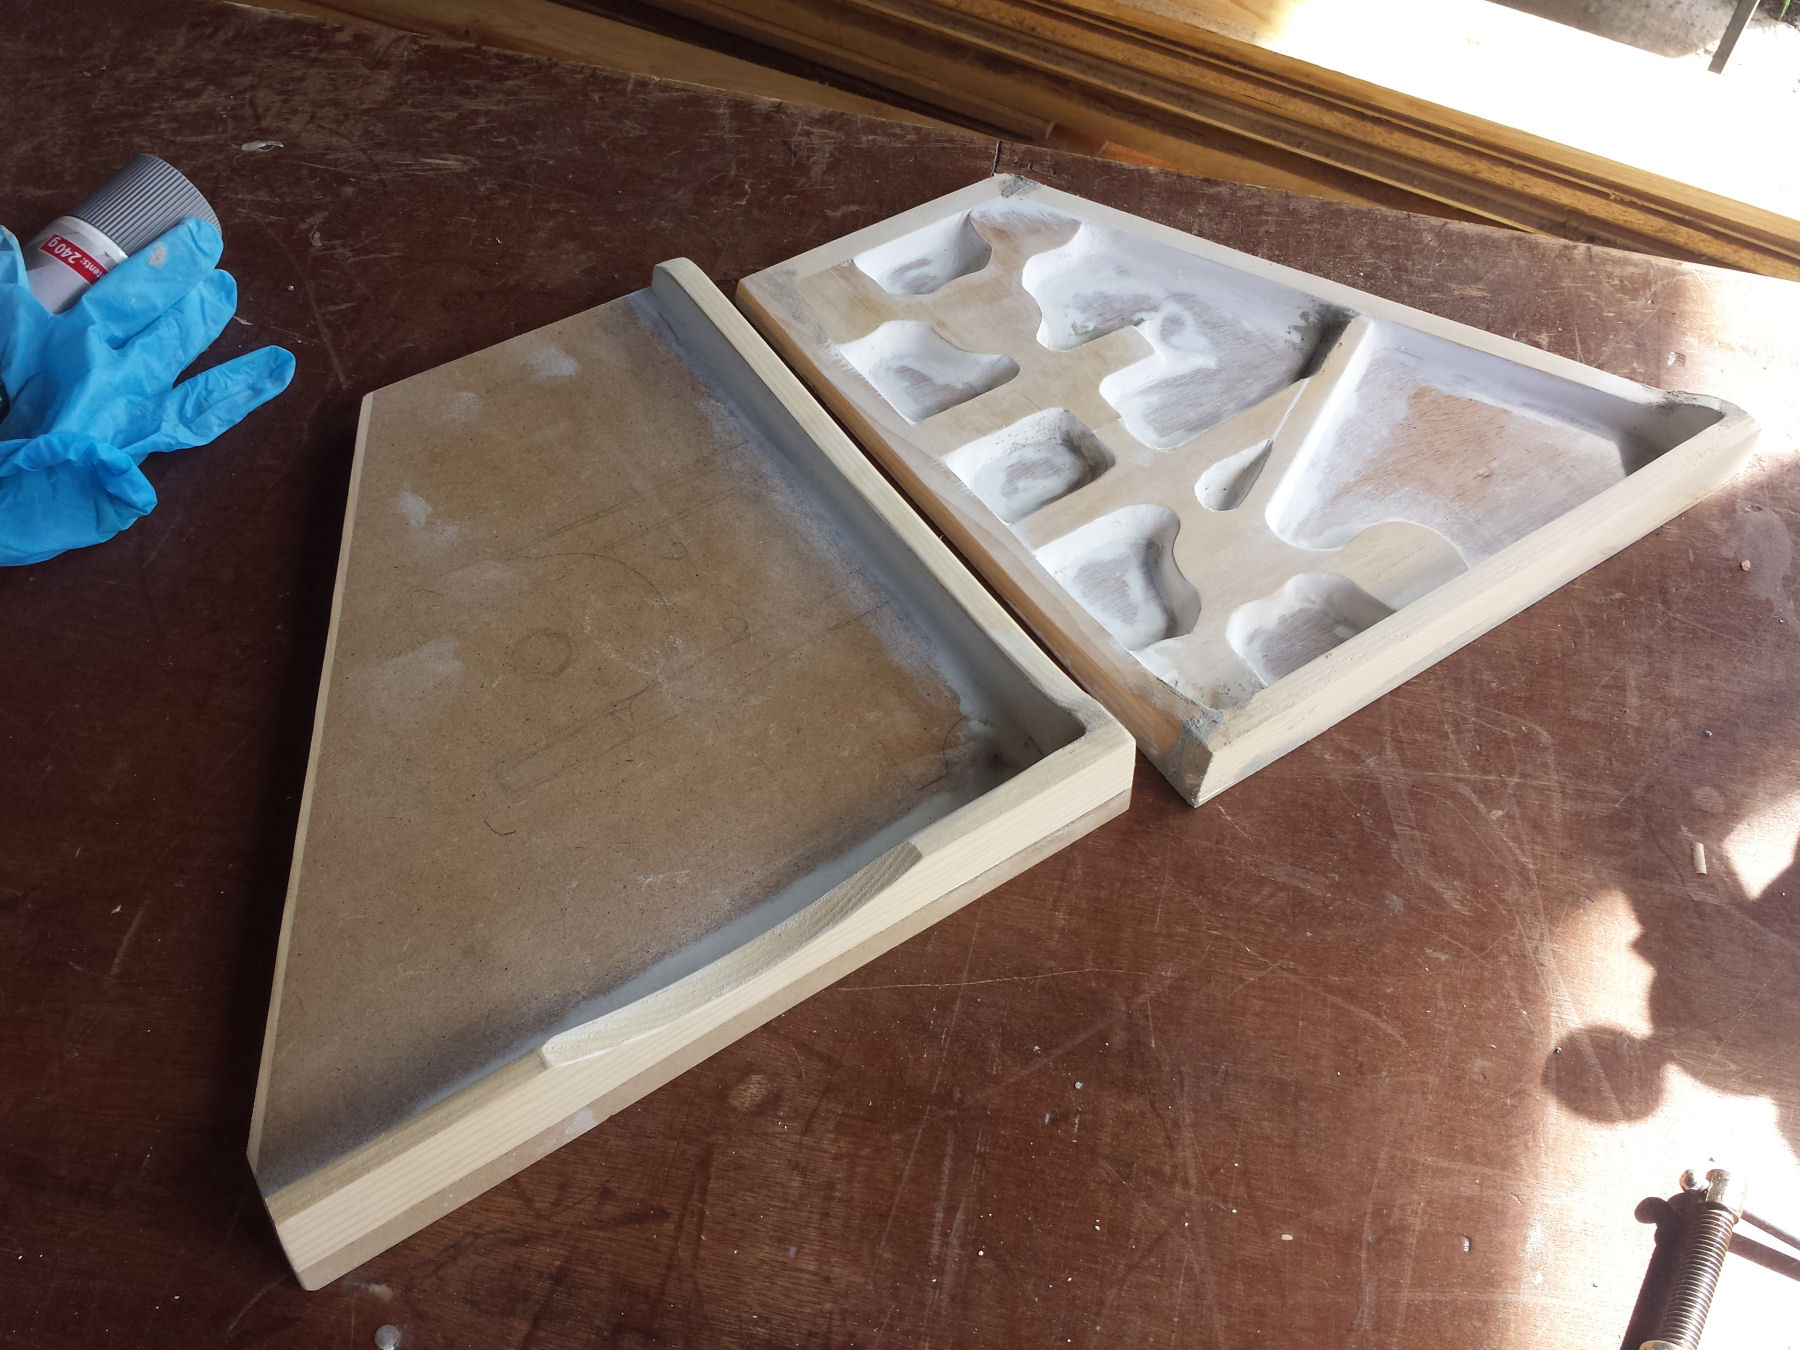
Two halves of a mdf and pine pattern that should make an end plate on the CNC gantry. Note the draft angle and filler rounding on all internal corners.
Sharp internal corners are also a big no no. They cause the sand to stick to the pattern on release, leaving crumbled corners in the mold. Aside from difficulty with the sand mold, sharp corners leave points of stress on the subsequent metal casting, and are best avoided in general. To this end all internal corners are usually rounded off with a bead of filler before the pattern is painted. I used standard poly-filler because it is what I had, but veterans swear by plastic auto body putty. If you watch the video of my gantry end ram up you will see evidence of this internal corner problem despite all my rounding-off efforts.
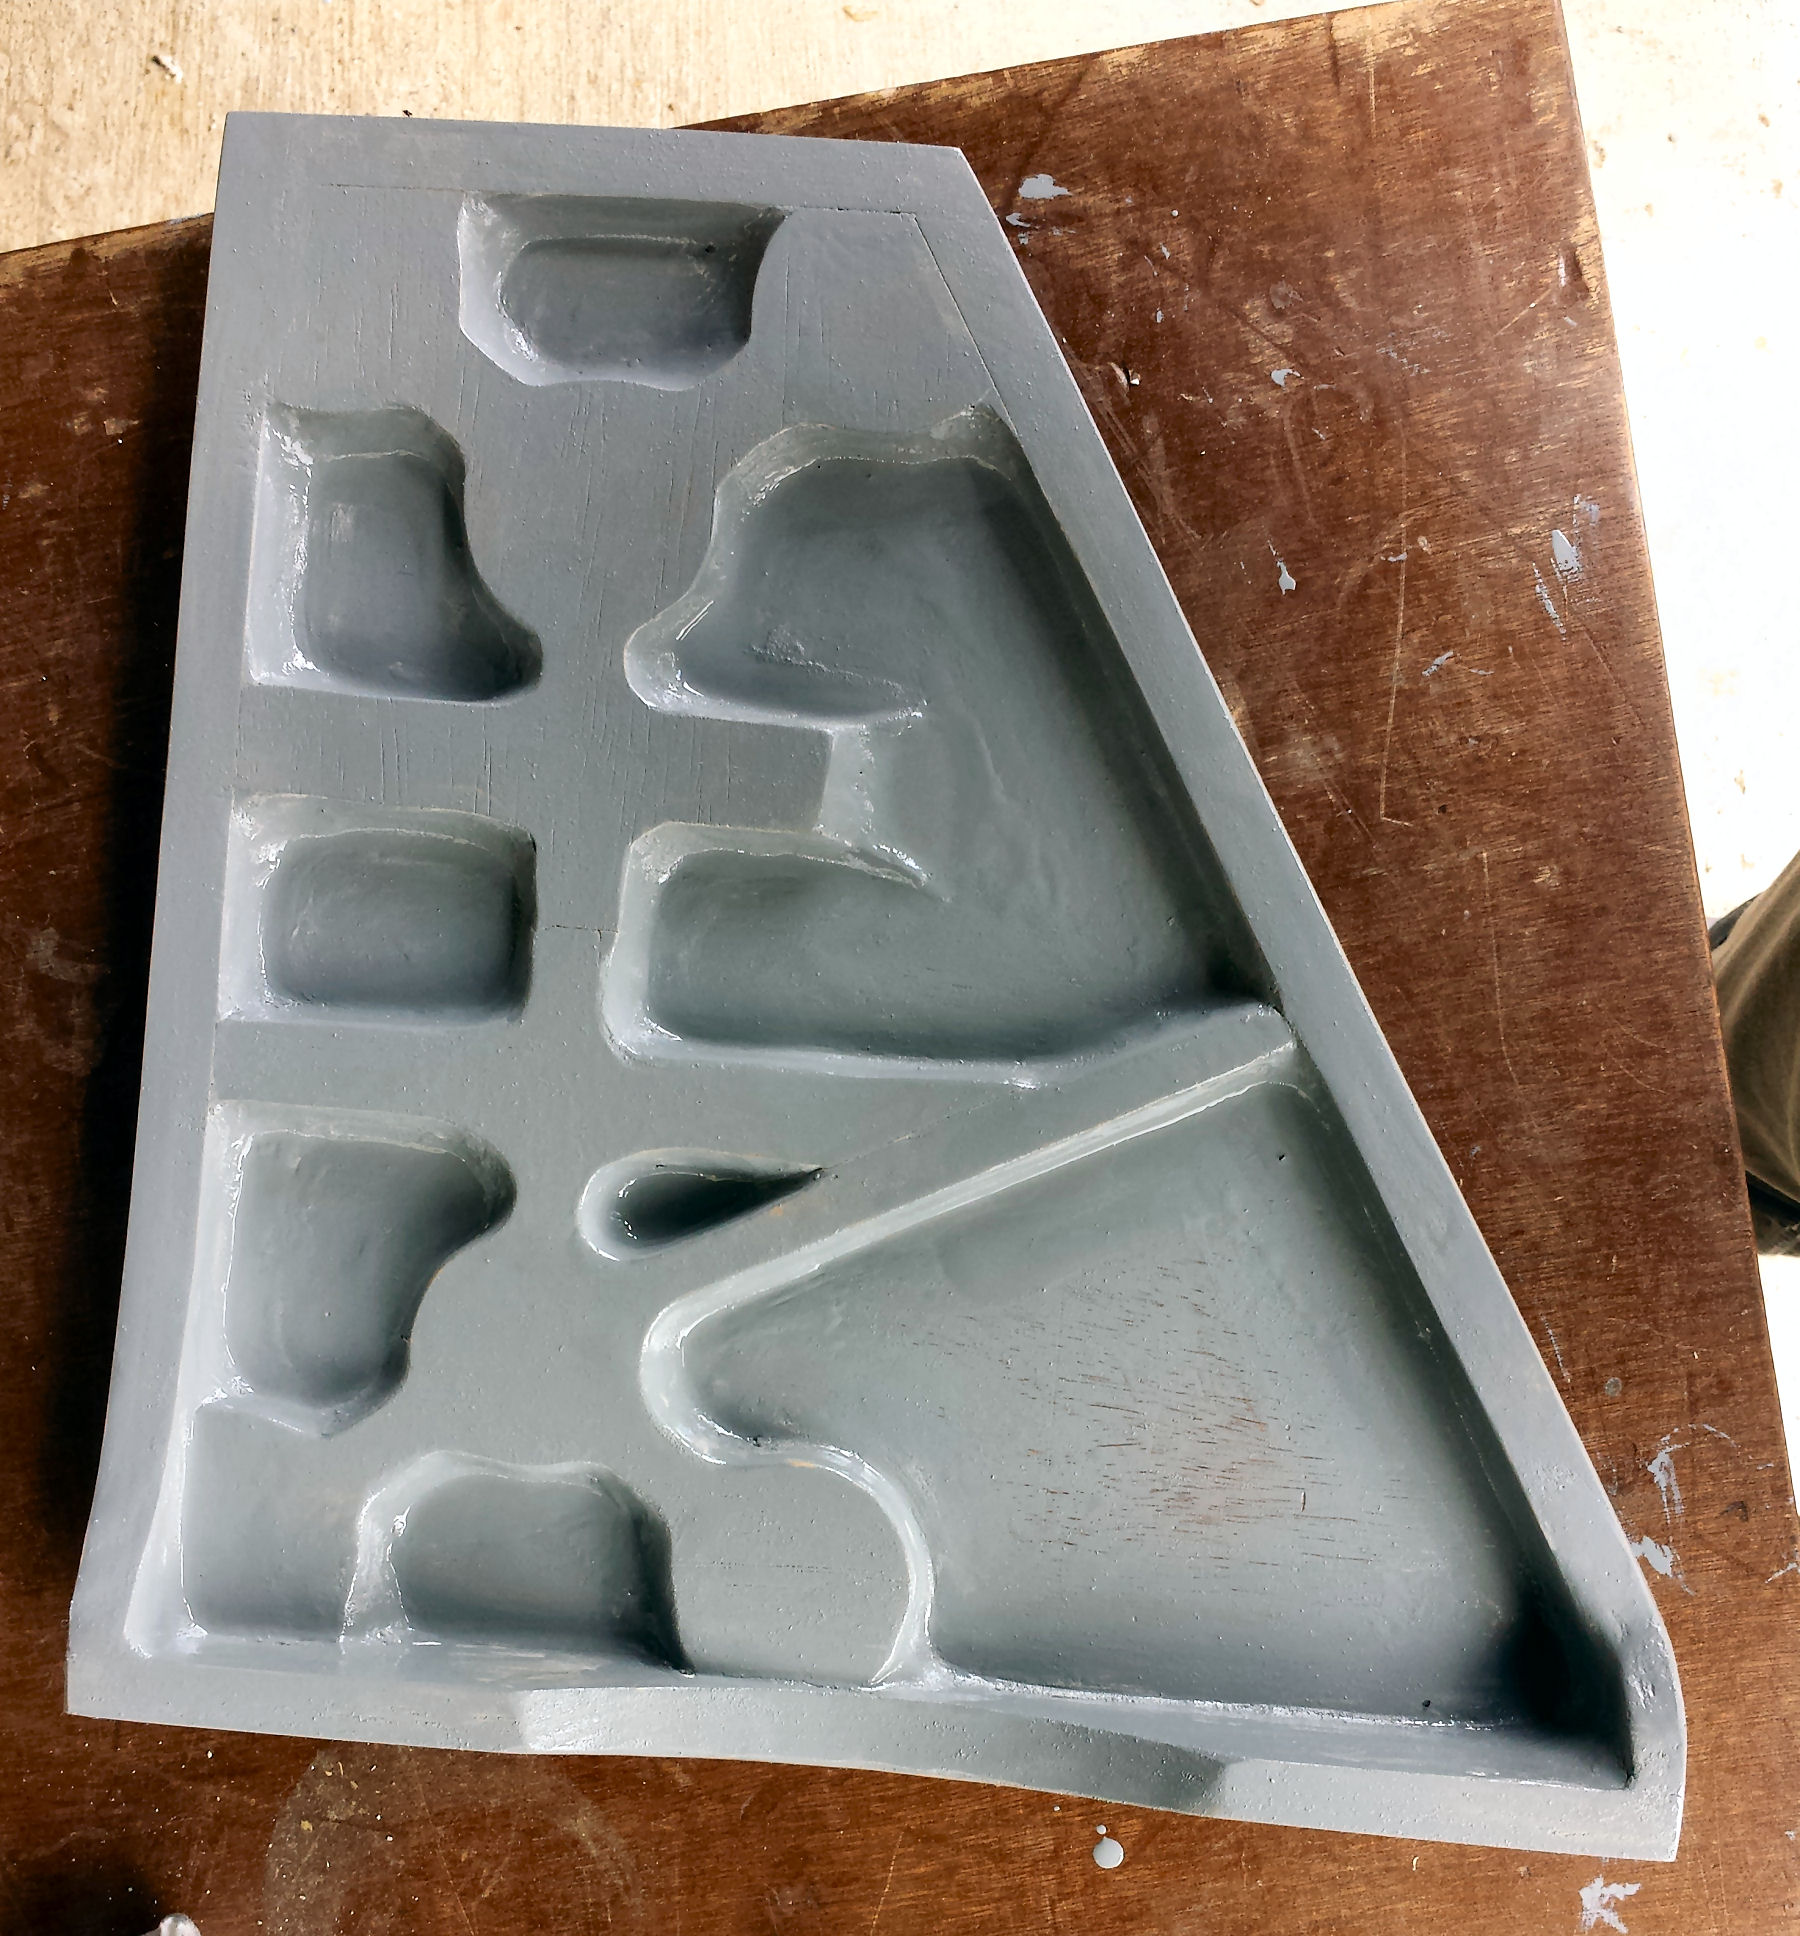
One half of the pattern, with one coat of paint, it took three coats before I was happy it would release OK.
Painted? Yep, if you make it out of wood it will normally need painting. Without paint the moisture from the green sand is absorbed by the wood, in the process the sand is practically glued on (much the same way people talk about ‘suction’ of plaster to semi-porous backgrounds). A couple of coats of paint are best – almost any paint or varnish will do though, whatever leftovers you have – the smoother the finish you can achieve with it the better – I used some old metal paint on this pattern.
Many patterns, like the one shown here, consist of two halves. This isn’t always necessary, but often makes the ramming up easier, as the pattern will not need to release from such a great depth of sand. In the case of the gantry end plate I am casting here, it has been split along the middle flat plane.
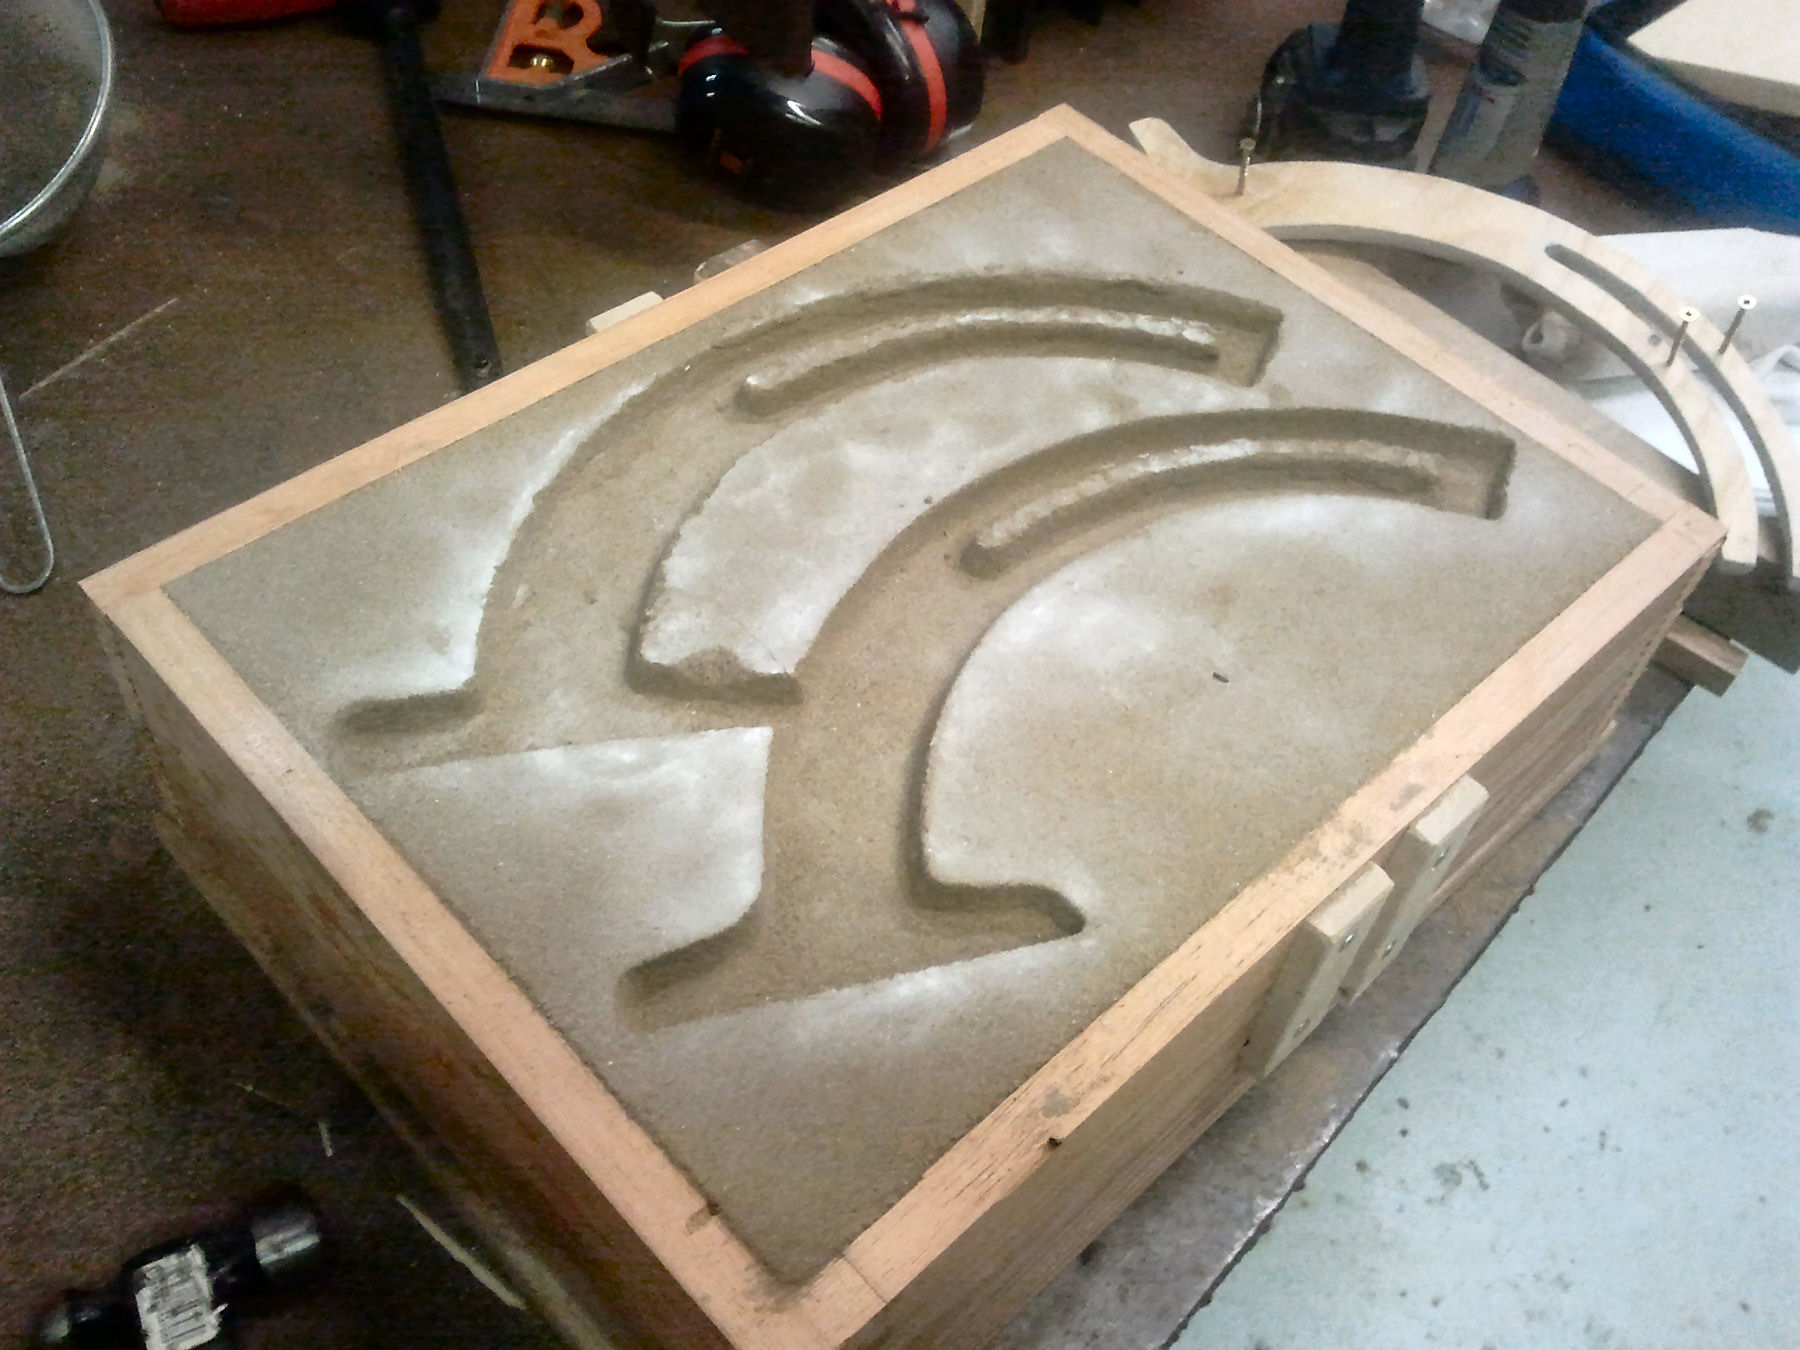
Once all the surfaces (apart from the one that will not come into contact with the green sand) are brilliantly smooth and all draft angles are checked it is time to place the pattern in a container (technically “a flask”) and pack the green sand tightly in around it – a process known as ‘ramming’ up the flask.
As shown in the video above , it’s a fairly simple process, but quite time consuming, especially if (and more likely when) you make mistakes and need to re-ram. Once happy with the mold, I like to give it a quick go over with a blow torch, just to remove some of the moisture in the sand that will be immediately contacting the molten aluminium. Les water equals less steam, equals less chance of gas being trapped in the casting.
The Flask
The container or flask, doesn’t need to be anything special, but it does need to be strong enough! My usual flask, wasn’t big enough to cast these end plates, so I quickly bodged one up from some old wooden draws I found. On the first ram up the sidewalls were bent outwards by the force of the compacting sand. So much so, that when the pattern was removed the walls squashed back inwards, destroying the mold :( This was solved with the addition of some scrap extrusion along the edges.
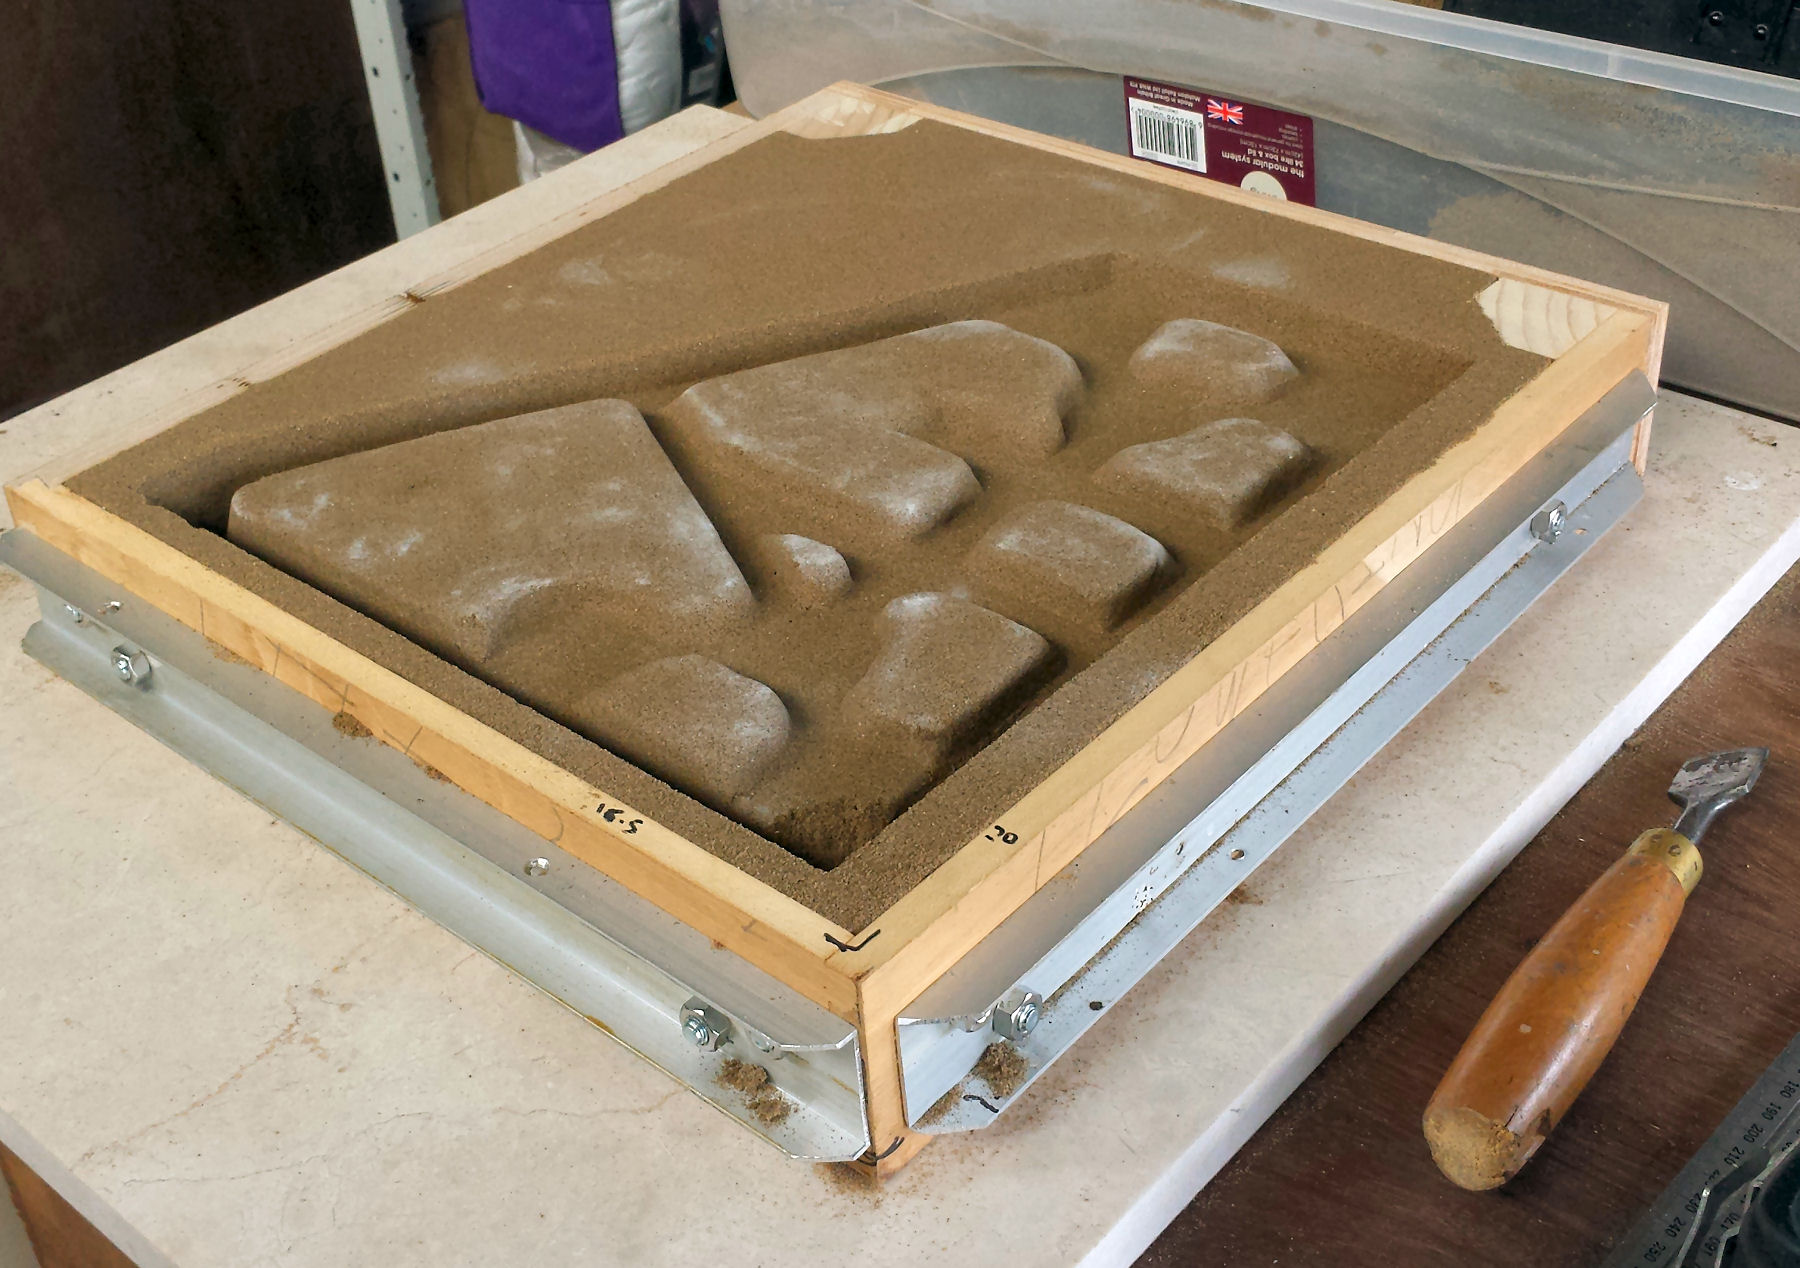
The bottom half of a sand casting flask is called a “drag”, while the top is the “cope”. Often they are interchangeable, and only distinguished by use.
Aside from making them strong enough, they need to go together squarely without gaps. Location pins or wedges can be used so they lock together in proper alignment.
Making tip: If you are going to make a flask from scratch, first make a single box shape with ~1″ thick wood, then rip the whole thing in half on the tablesaw. This should give you two halves that match exactly. Rough internal surfaces are best so don’t varnish or paint the inside of the flask, that would stop the sand sticking to the sidewalls. For extra grip, I have even seen people go so far as to cut a series of small channels on the inside faces.
This is half of my smaller but sturdier flask being used to cast some trunnions for the big disk sander. Note the hardwood locating dowels on the front and back face. They receive a wedge shaped protrusion on the cope.
Potential problems with Green Sand Molds
The pitfalls of this casting method are abundant but are avoidable with care and experience. Many of these problems don’t exist with lost foam casting (which is why I like it), and I suspect that almost all DIY green sand casters will have come up against one or more of these problems, so if you’re starting out, you can expect to as well!
- Mismatch between the halves along the parting lines. Even with locating pins on the flasks, the patterns themselves can move as you pack in the sand. One way round this is to ram the flask halves one atop the other, with parting dust (usually talcum powder) between the halves. For this method you need to have either a one piece pattern, or a pattern with dowels that indexes it together.
- The pattern won’t come out! It is always tricky to remove the pattern, even if the planets are in alignment and rainbows of heavenly good will are flooding the shop. Unfortunately for the hobbyist or DIY caster, experience is the key here – knowing how hard to tap the pattern to aid in release vs, not damaging the mold is something you get a feel for after a couple of goes. Even then it can be difficult if you are casting a new shape or size pattern. Sprinkling parting dust (talc) on the pattern before packing the sand is a must. Bigger draft angles, a smoother waterproof finish on the pattern, and clever pattern orientation, can all help.
- When the pattern does come out, the sand collapses, especially in the corners. Have a pattern suitably intricate and it will happen – think of it as a steady hand game, see tips for release in previous point, make sure corners are rounded over sufficiently and try again.
- The whole thing collapses when I lift the flask. If you got the green sand mix right this shouldn’t happen, unless… Either the pattern is too big and shaped such that there is little strength to the finished mold, or the flask isn’t strong enough, and the sidewalls are flexing as you handle it (the green sand wont flex with the flask, it will crack). Bear in mind that parts over about a foot square are always going to be troublesome for the simple green sand mix described here. In those instances a mix that includes other binders like portland cement is often used.
An internal cave in allows aluminium to leak out the side of the flask, leaving not enough to properly fill the mold.
The worst of problems though, is when the mold checks out and looks good, but collapses or in some other way fails during the actual aluminium pour. In that case a lot of extra time is wasted having to cut up and re-melt the failed part, sieve and re-mull the green sand (it goes hard and a bit dry after being in contact with the extreme heat of molten aluminium), rectify any obvious problems, and re-ram the mold.
It takes a long time to ram up complicated patterns like the end plates for the CNC gantry. Each time you do it there is a certain amount of dread that you might have to do it again.
Example Aluminium Pour into Green Sand
If you have a good aluminium alloy to melt (see the end section on which scrap to use), you don’t want to hang about during the melt for a few reasons.
1. Hydrogen gas can be absorbed by liquid aluminium, and is the usual culprit if you get any pinhole defects in the final cast parts. This annoying effect is minimised by heating it only just past melting point and not much hotter, and holding it in that liquid state for as little time as possible. The amount of hydrogen absorbed is proportional to the temperature of the aluminium [1], thus temperatures much higher than say 700oC are undesirable.
2. If the melt is held at high temperatures for long periods, the more volatile constituents of the alloy, like zinc can be ‘burnt off’.
In sum, we want to melt the scrap aluminium as quick as possible, and pour as soon as the melt is about 10 degrees over melting temperature. So far I have been fudging the process somewhat because I haven’t set up with a thermocouple to measure the temperature of the liquid aluminium. I think as a DIY caster, if you’re attentive enough and methodical in adding lumps of scrap to the crucible, it is possible to gauge roughly what the temperature is likely to be.
How I now pour molten metal in 10 steps:
- Before even lighting the furnace, put the crucible in it, get your mold all set out, and do a ‘dry run’ of your pour. By that I mean, imagine the crucible is full of molten metal and wearing a full compliment of protective gear, use your foundry tools to lift out the crucible, move it to where you need and pour.
- If all goes well with your practice run, put the crucible back in and light up the furnace!
- Put your scrap in the crucible to melt.
- Monitor the scrap aluminium. Once molten, add more if required.
- Try and notice when scrap has all become liquid. As far as possible do not stir or disturb the melt.
- Give it 5 – 10 minutes more to be sure it’s hot enough (of course this time will vary from furnace to furnace, which is why a temperature probe would be useful). Here’s a nice article on how pouring temperature (and speed) can effect the final part strength – In sum, the closer the alloy is to its melting point the stronger the finished casting (optimum pouring temperature is between 700oC and 750oC for typical casting alloys). Overheating the molten metal is certainly not desirable.
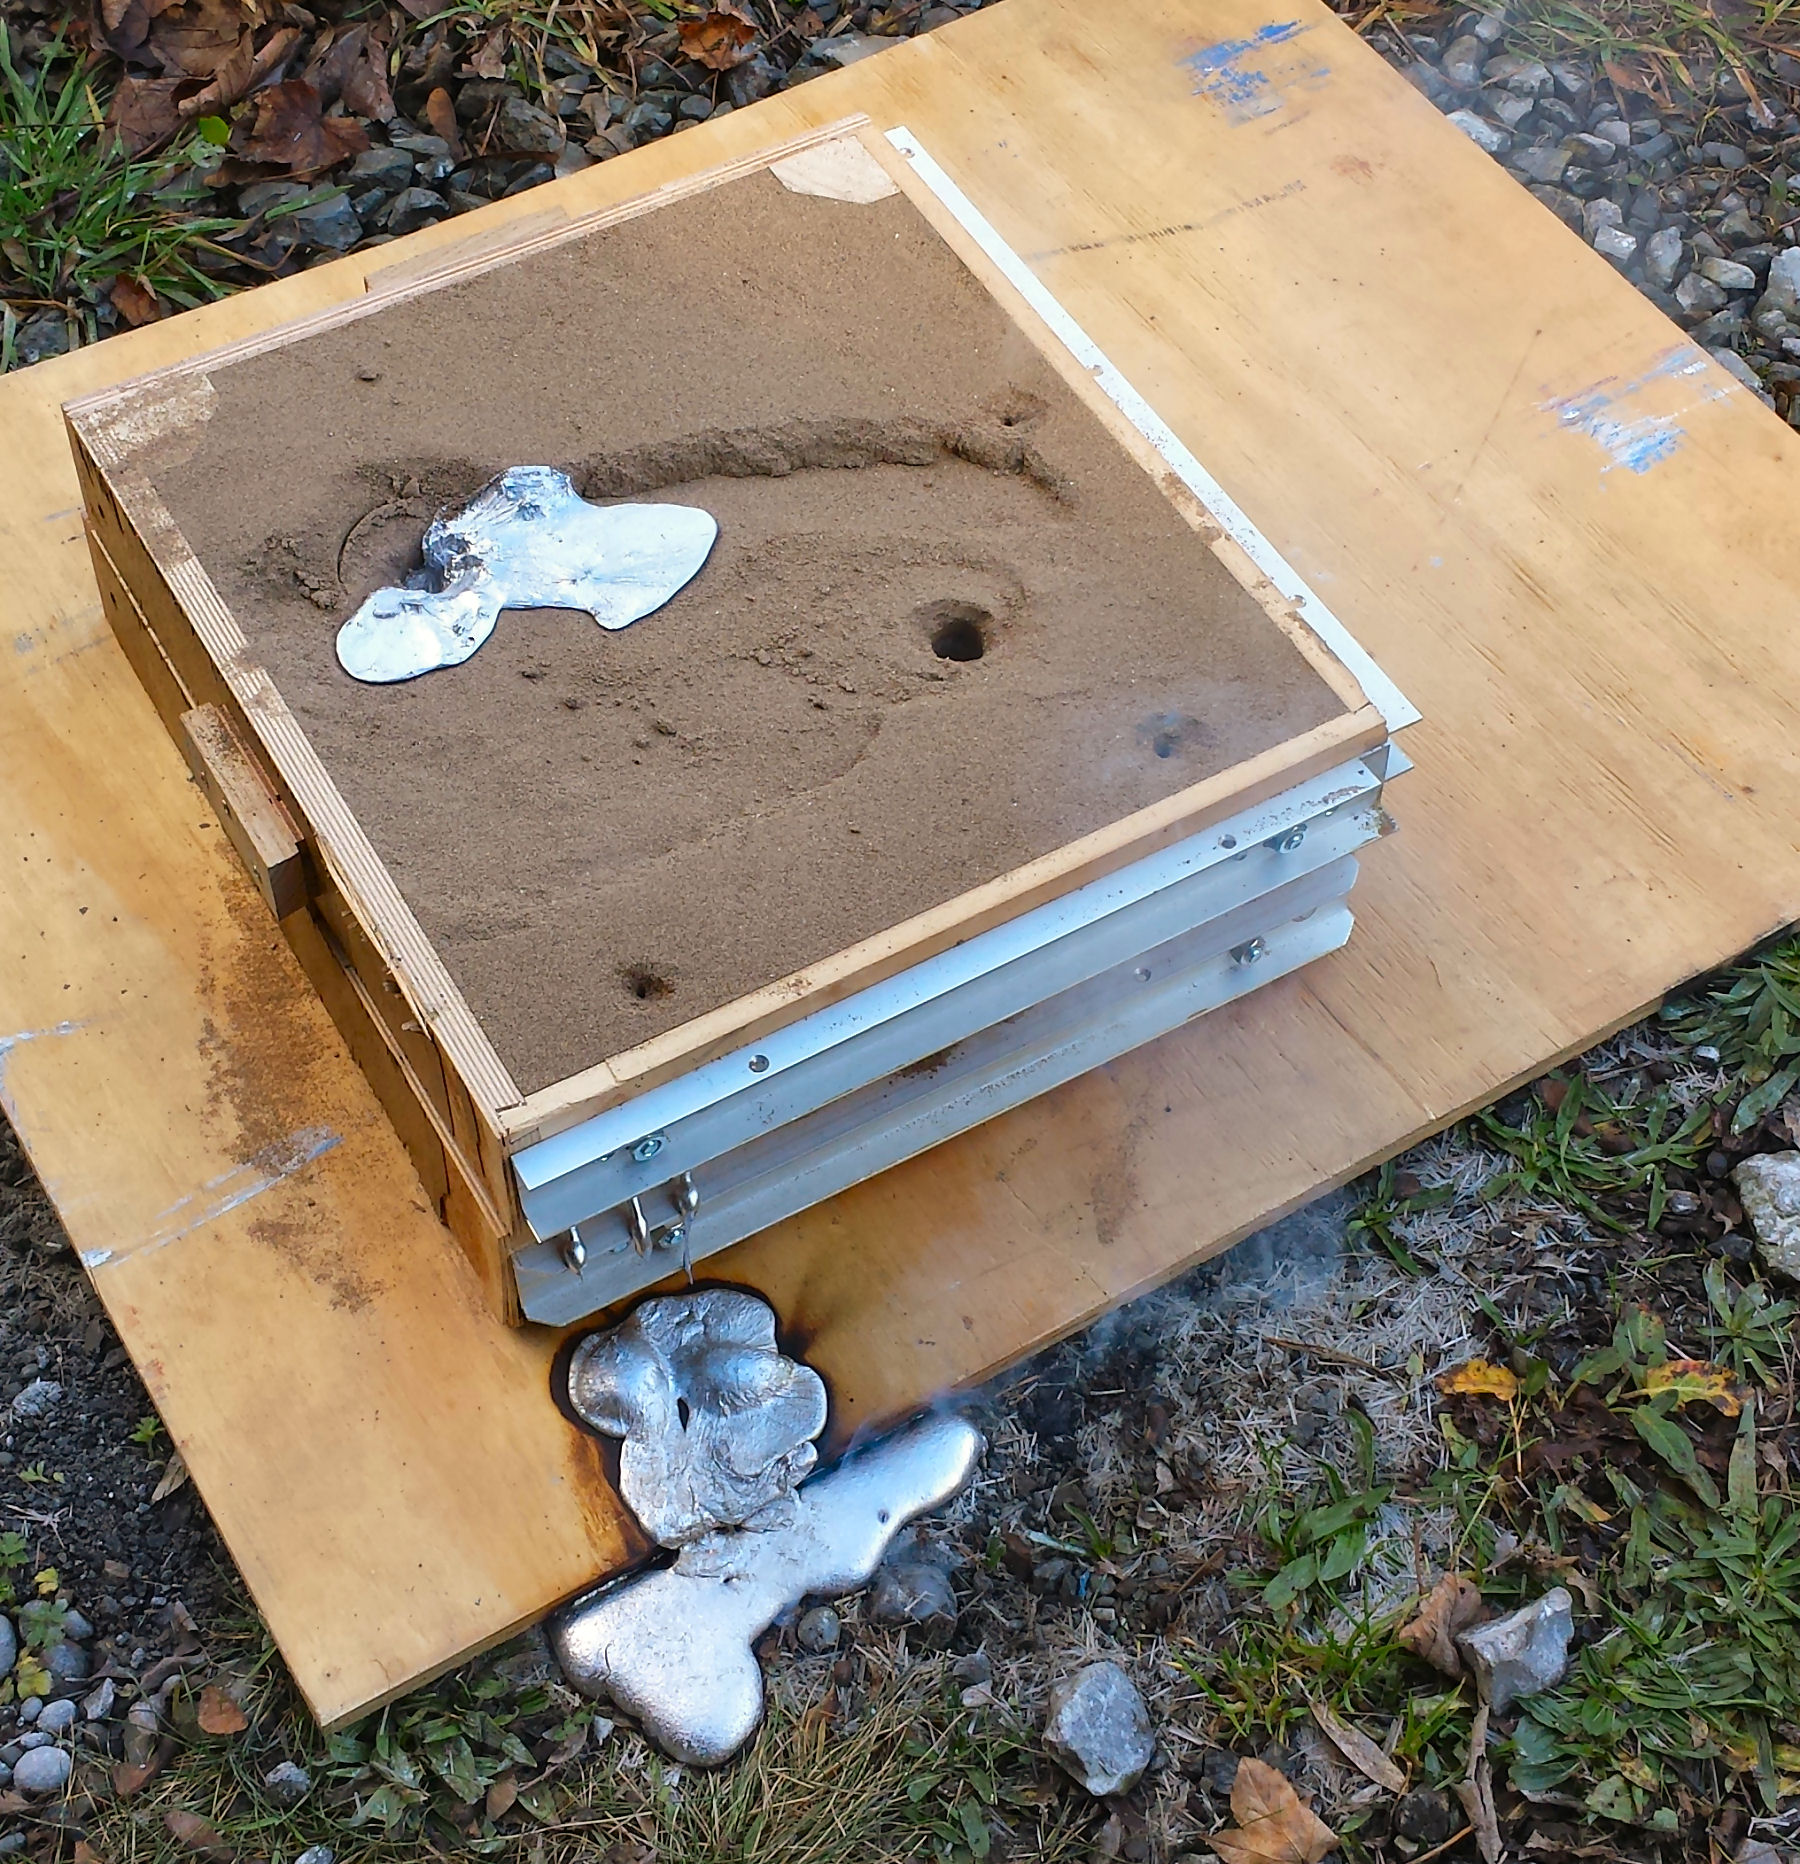
- Turn off the furnace and immediately “de-dross”. That is, use a long handled stainless steel slotted spoon (like you fine in the kitchen – but not that one, it wont be so good for serving food when your done!) to skim the impure and oxidised surface layer off the molten metal. I do this before removing the crucible from the furnace, so it doesn’t cool so rapidly.
- Lift out the crucible with the foundry tools, just as in the dry run.
- Pour in aluminium alloy into mold as evenly as possible (don’t dump it in all at once), the rate at which you actually pour the liquid effects the finished part strength.
- Empty any excess molten metal into a muffin tray or similar to make ingots for future use. It is important to think about this step beforehand because it is important. You can’t simply leave the metal in the crucible – the very different coefficient of thermal expansions will probably create crucible wreckage!
What about flux and de-gassing?
Of course I’m learning as I go here, and casting at a very small scale, but… I have found both somewhat unnecessary and an added complication that can make things worse rather than better.
Should I Flux the Molten Aluminium?
I don’t, here’s why. Using flux reduces the surface tension of your melt and loosens the oxide from the metal. This is particularly useful if you want to recover all the metal from this surface oxide layer (the dross), or if you are looking to add new alloying elements to your melt. If, for example, you wanted to add some copper flakes, without the flux the oxide layer would make it difficult or impossible for the copper to dissolve in the molten aluminium. Even if you stirred it in, the oxide can easily stick to and coat the copper, preventing absorption. I however, am not looking to create specific alloys in this way (more on this later). Neither is my scale sufficient to make recovery of 50% more metal from the dross layer worth the cost of flux. Bear in mind that the scrap I melt is essentially free, and a product of good scrounging.
Furthermore fluxes tend to be hygroscopic (they absorb moisture from the air), so unless you keep them mega dry and tell them bed time stories, they can actually introduce hydrogen to the melt – means more pinhole defects in finished part. Careless use of flux that has absorbed moisture can even cause explosions when added :(
In fact the oxide layer on the surface can actually provide the useful function of preventing hydrogen from being absorbed into the liquid aluminium from humidity in the atmosphere. As such, if a flux is going to be used, I would recommend using it just before de-drossing and pouring. While we are on the subject of hydrogen absorption, this is a good argument for NOT casting in foggy weather when humidity is very high. In my experience, high atmospheric humidity makes a surprising difference to the number of defects, and therefore strength, of the final part, especially if you don’t take special measures to degas the melt.
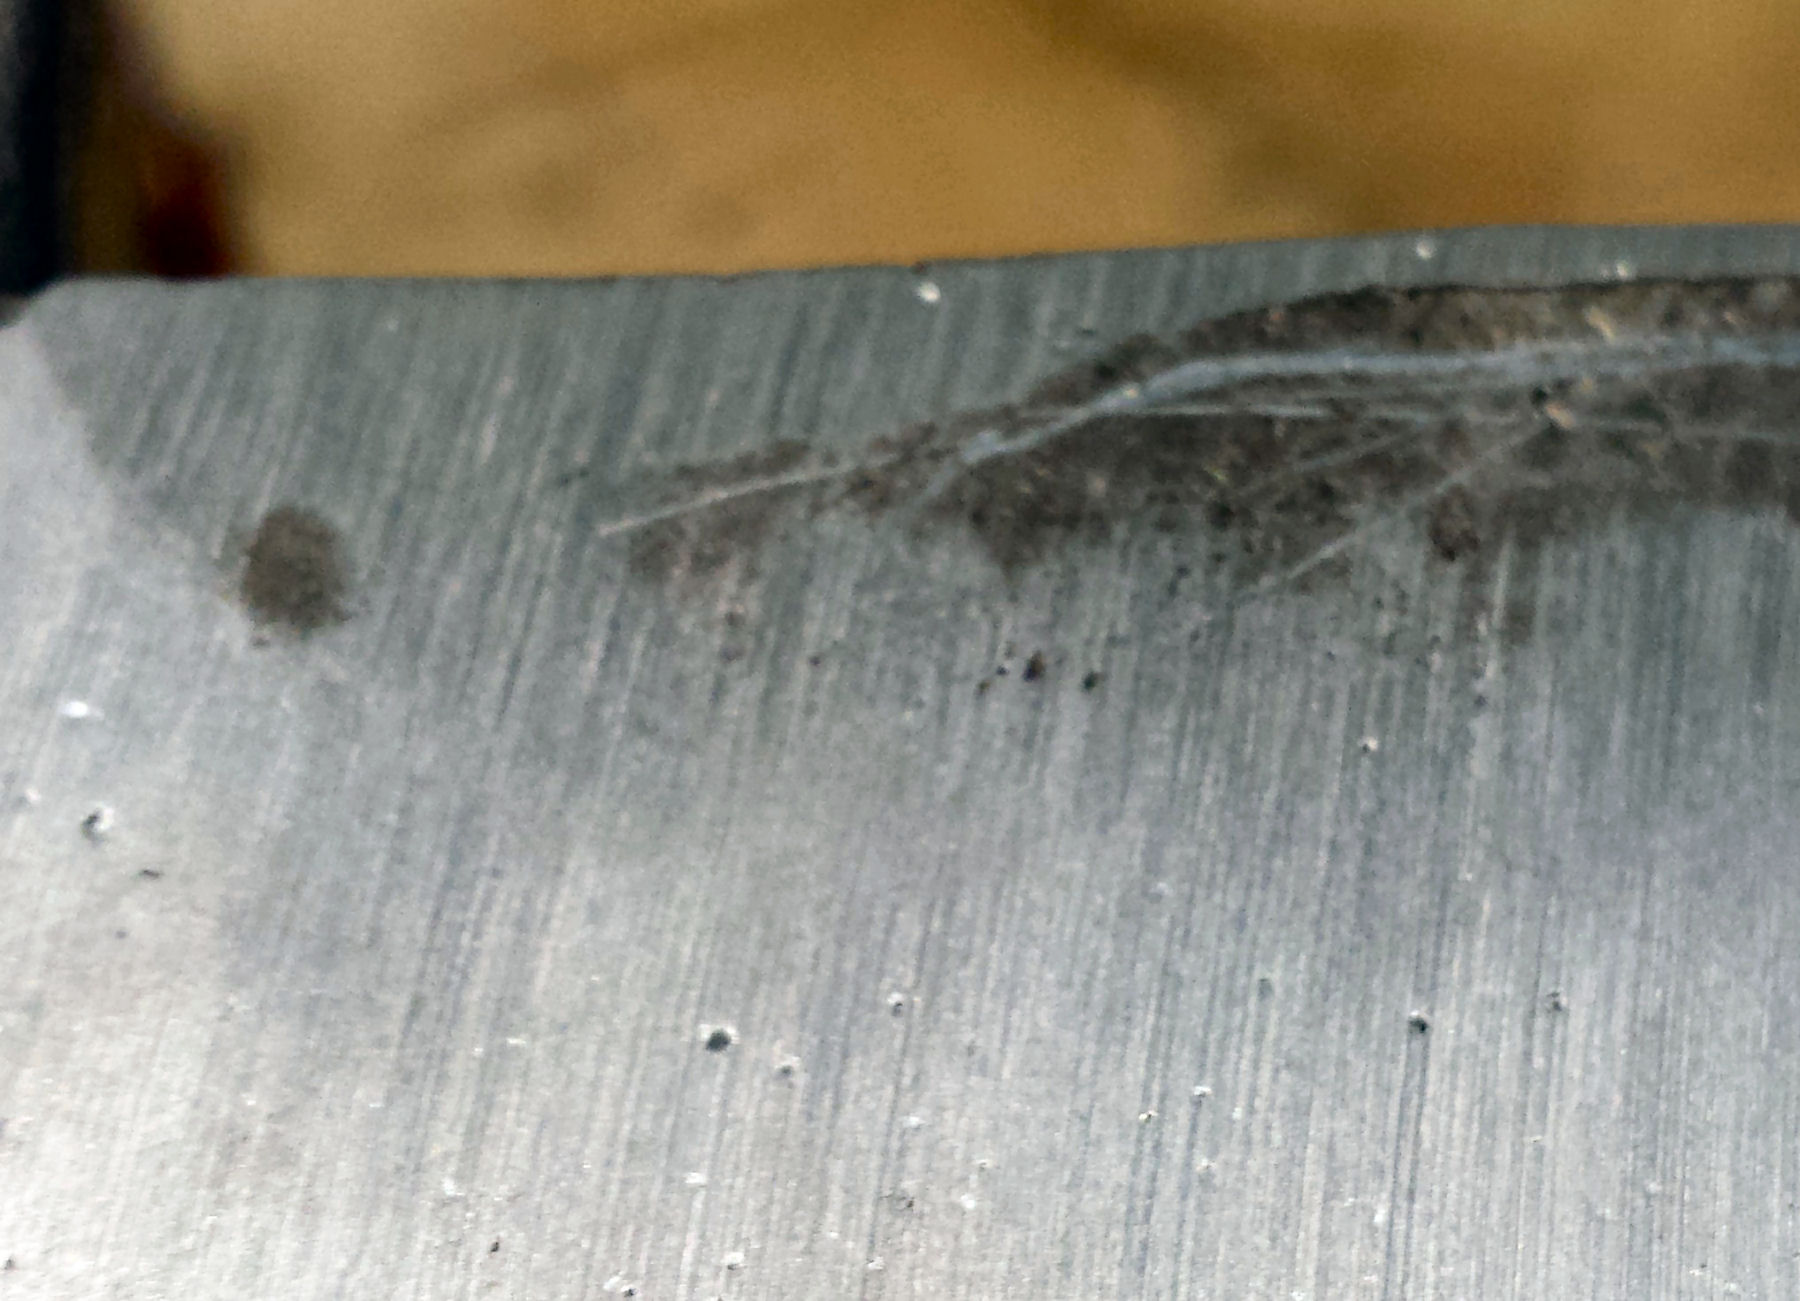
Above: shows a close up of my gantry end plate casting after a little grind on the disc sander (the less reflective dark patches being the original as cast surface). The vertical lines are groves left by the sanding abrasive while the small black and white blobs are pin hole defects. These are probably caused by small hydrogen bubbles in the melt, which would NOT have been prevented with a flux.
De-Gassing Molten Aluminium
De-gassing the melt is done in two main ways, both of which involve ‘scrubbing’ the liquid with inert gas to try and catch the hydrogen bubbles.
Degas method 1: It is common for hobbyist and DIY casters to use a perforated plunger, a bit like a small upturned colander with a handle, to submerge a chlorine producing compound, like a hexachloroethane (C2Cl6) tablet , into the melt. The theory is that the tablet immediately reacts with the molten metal, producing chlorine gas, which bubbles out of the melt and ‘catches’ the hydrogen gas on rout. To be effective the bubbling needs to be consistent and dispersed throughout the melt.
I can’t recommend this method, at least not any version of it that produces chlorine gas. Chlorine gas is very poisonous and a suitable gas mask (a standard dust mask would not be sufficient) would have to be worn. Like fluxes, degas compounds must be kept very dry. Any moisture and using a degassing tablet will add more hydrogen than it extracts.
Degas method 2: Another way to degas, less used by DIYers, is to bubble an inert gas, like argon or nitrogen, from a cylinder through the molten aluminium. Often a ceramic ‘lance’ (perforated pipe) is used to distribute the gas through the melt. Again the theory being that the bubbling gas ‘captures’ the small hydrogen bubbles on their way to the surface. I haven’t seen anyone do it, but I imagine one could use the argon cylinder from MIG welding kit for this quite effectively. The pressure needs to be carefully regulated, and slowly increased – apparently about 20 psi is used when done industrially, but I would start significantly lower than that!
Advantages of Green Sand Casting
In retrospect, making the gantry end plates with the green sand method was foolish, Why? Because green sand casting has one very significant advantage over lost foam, and that is that you can re-use the pattern as many times as needed. Not a benefit you can really take full advantage of when you are making a batch of one! I do need two end plates – one for each end of the gantry – but each end is different so I can’t re-use the pattern.
If I was making 5 or ten of them I would be all over this method, assuming I didn’t already have a CNC to help make foam molds that is…
Lost Foam Casting
Using a polystyrene foam pattern that gets vaporized by the molten aluminium is also referred to as “Expendable Pattern Casting” (EPC), because one way or another, for each casting you do, you will need to make a whole new pattern. If you tend to want to make crazy prototyping or one off machine parts like I do, this isn’t necessarily a huge problem. After a little practice foam is just as easy, if not easier, to work into a pattern using woodworking tools, as a wooden one. Sanding and planning are problematic (it makes a mess and doesn’t work) so things need to be cut to the correct size on the table or band saw. One big advantage of the lost foam method is that the pattern itself can be simpler because there isn’t need for draft release angles – the foam pattern stays in the sand.
Depending on the part, not needing draft can also translate to a lot less post-casting machining, because edges can be cast flat as required. It is fair to say that in both the pattern making, and the post-cast processing stages, the lost foam method is kinder to your tools.
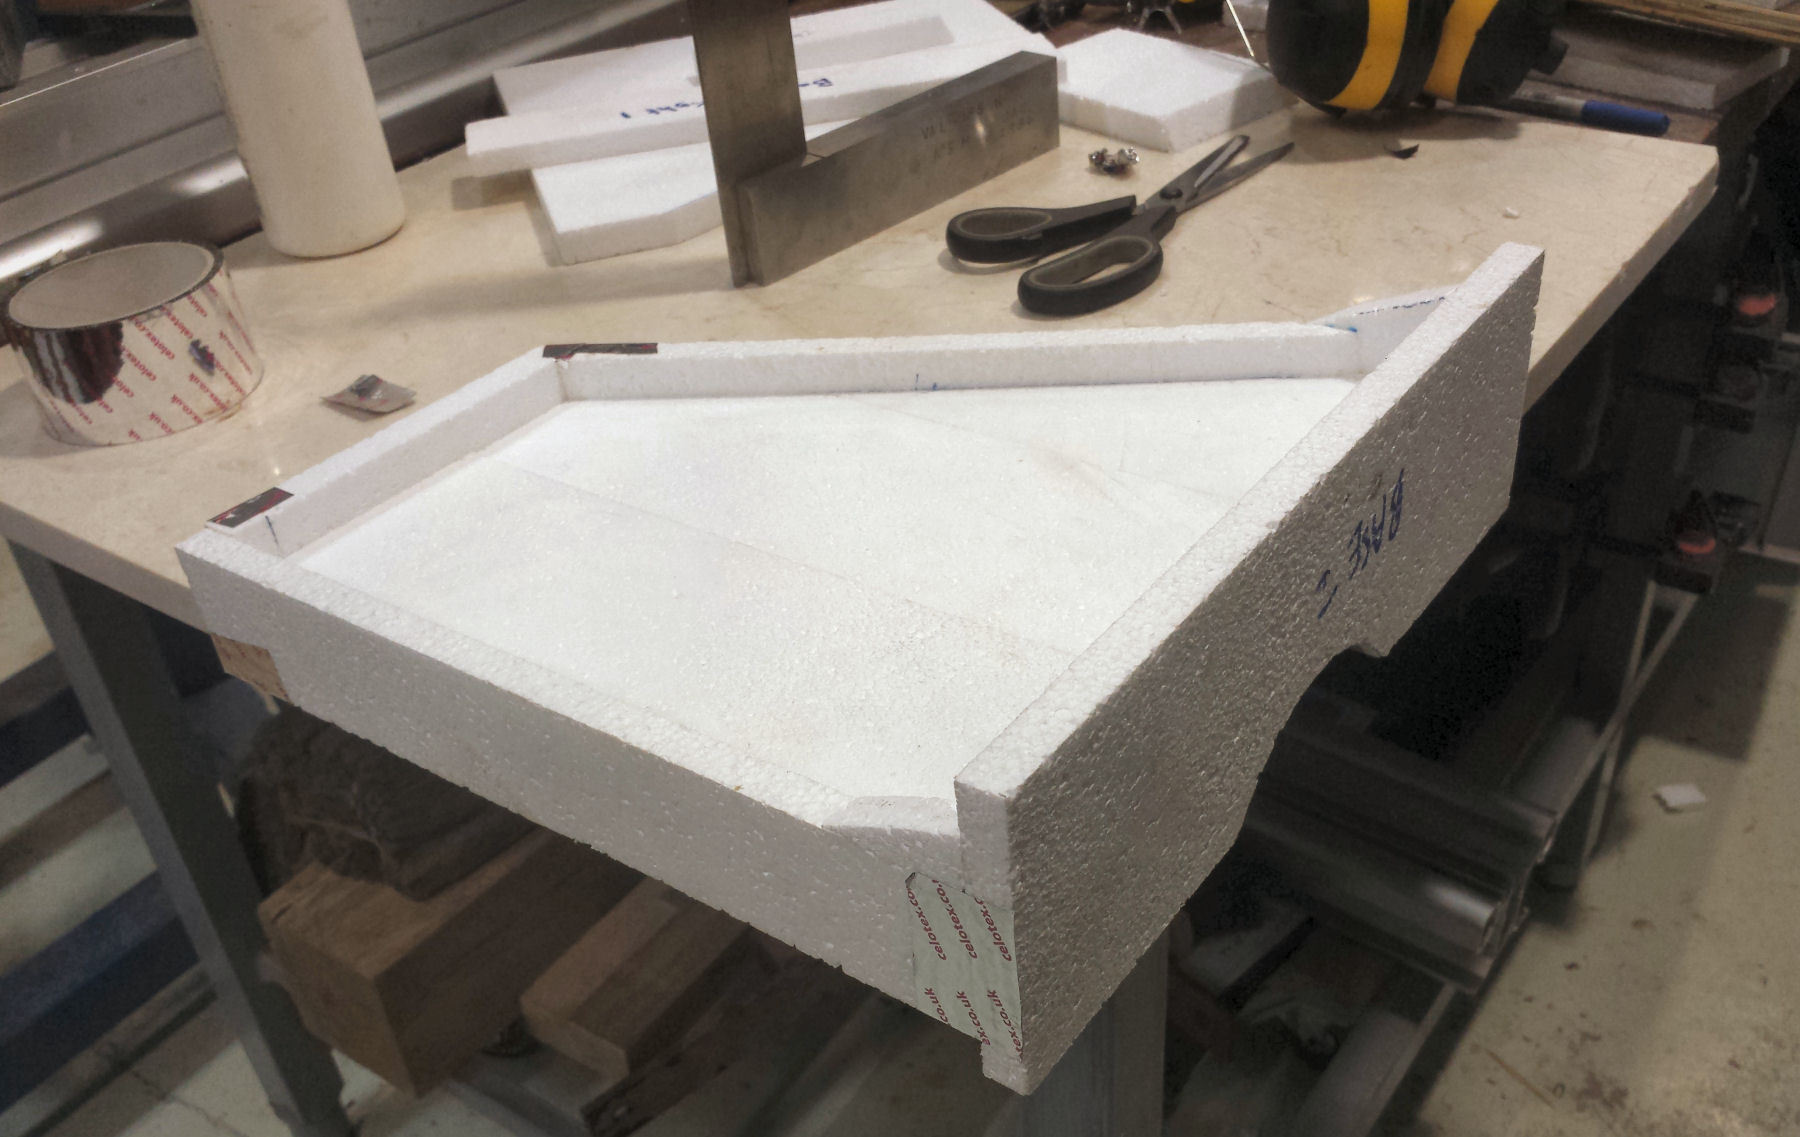
The foam pattern is cut mainly on the tablesaw, and glued and taped up on a flat surface, in this case an old marble floor tile.
Making the Expendable Foam Pattern
To shape foam, I use a bandsaw for curved cuts, the tablesaw for most of the ripping and cross cuts, and heated metal rings to make circular cut-outs. One very popular method of cutting foam to size is to use a hot-wire cutter. I have used these in the past, and the cut never seems quite as good as the tablesaw with a sharp fine cross cut blade. There are two main benefits to the hot-wire foam cutters though: 1. they don’t produce dust like other methods, and 2. they can rip foam boards as wide as the hot-wire is long. Either way, my tablesaw has a convenient ripping fence and crosscut sled, and to make similar for my very primitive hot-wire cutter was a waste of time.
Joining the foam is quite easy, I just used some old ’10 min-set’ wood glue. I admit that more research about how this vaporises (or not) when it come into contact with molten aluminium would be welcome, but I haven’t experienced any noticeable problems with it. Some DIYers suggest using hot-melt-glue, but I have found it too easy to melt the foam with the glue gun tip, and even the glue itself.
Foil tape is great for reinforcing the joints. I have been using Celotex branded tape that is designed to seal the joins on foil backed PIR insulation boards. This tape is very thin and seems to work well. I also, and somewhat more experimentally, use the tape to improve the foam pattern’s surface.
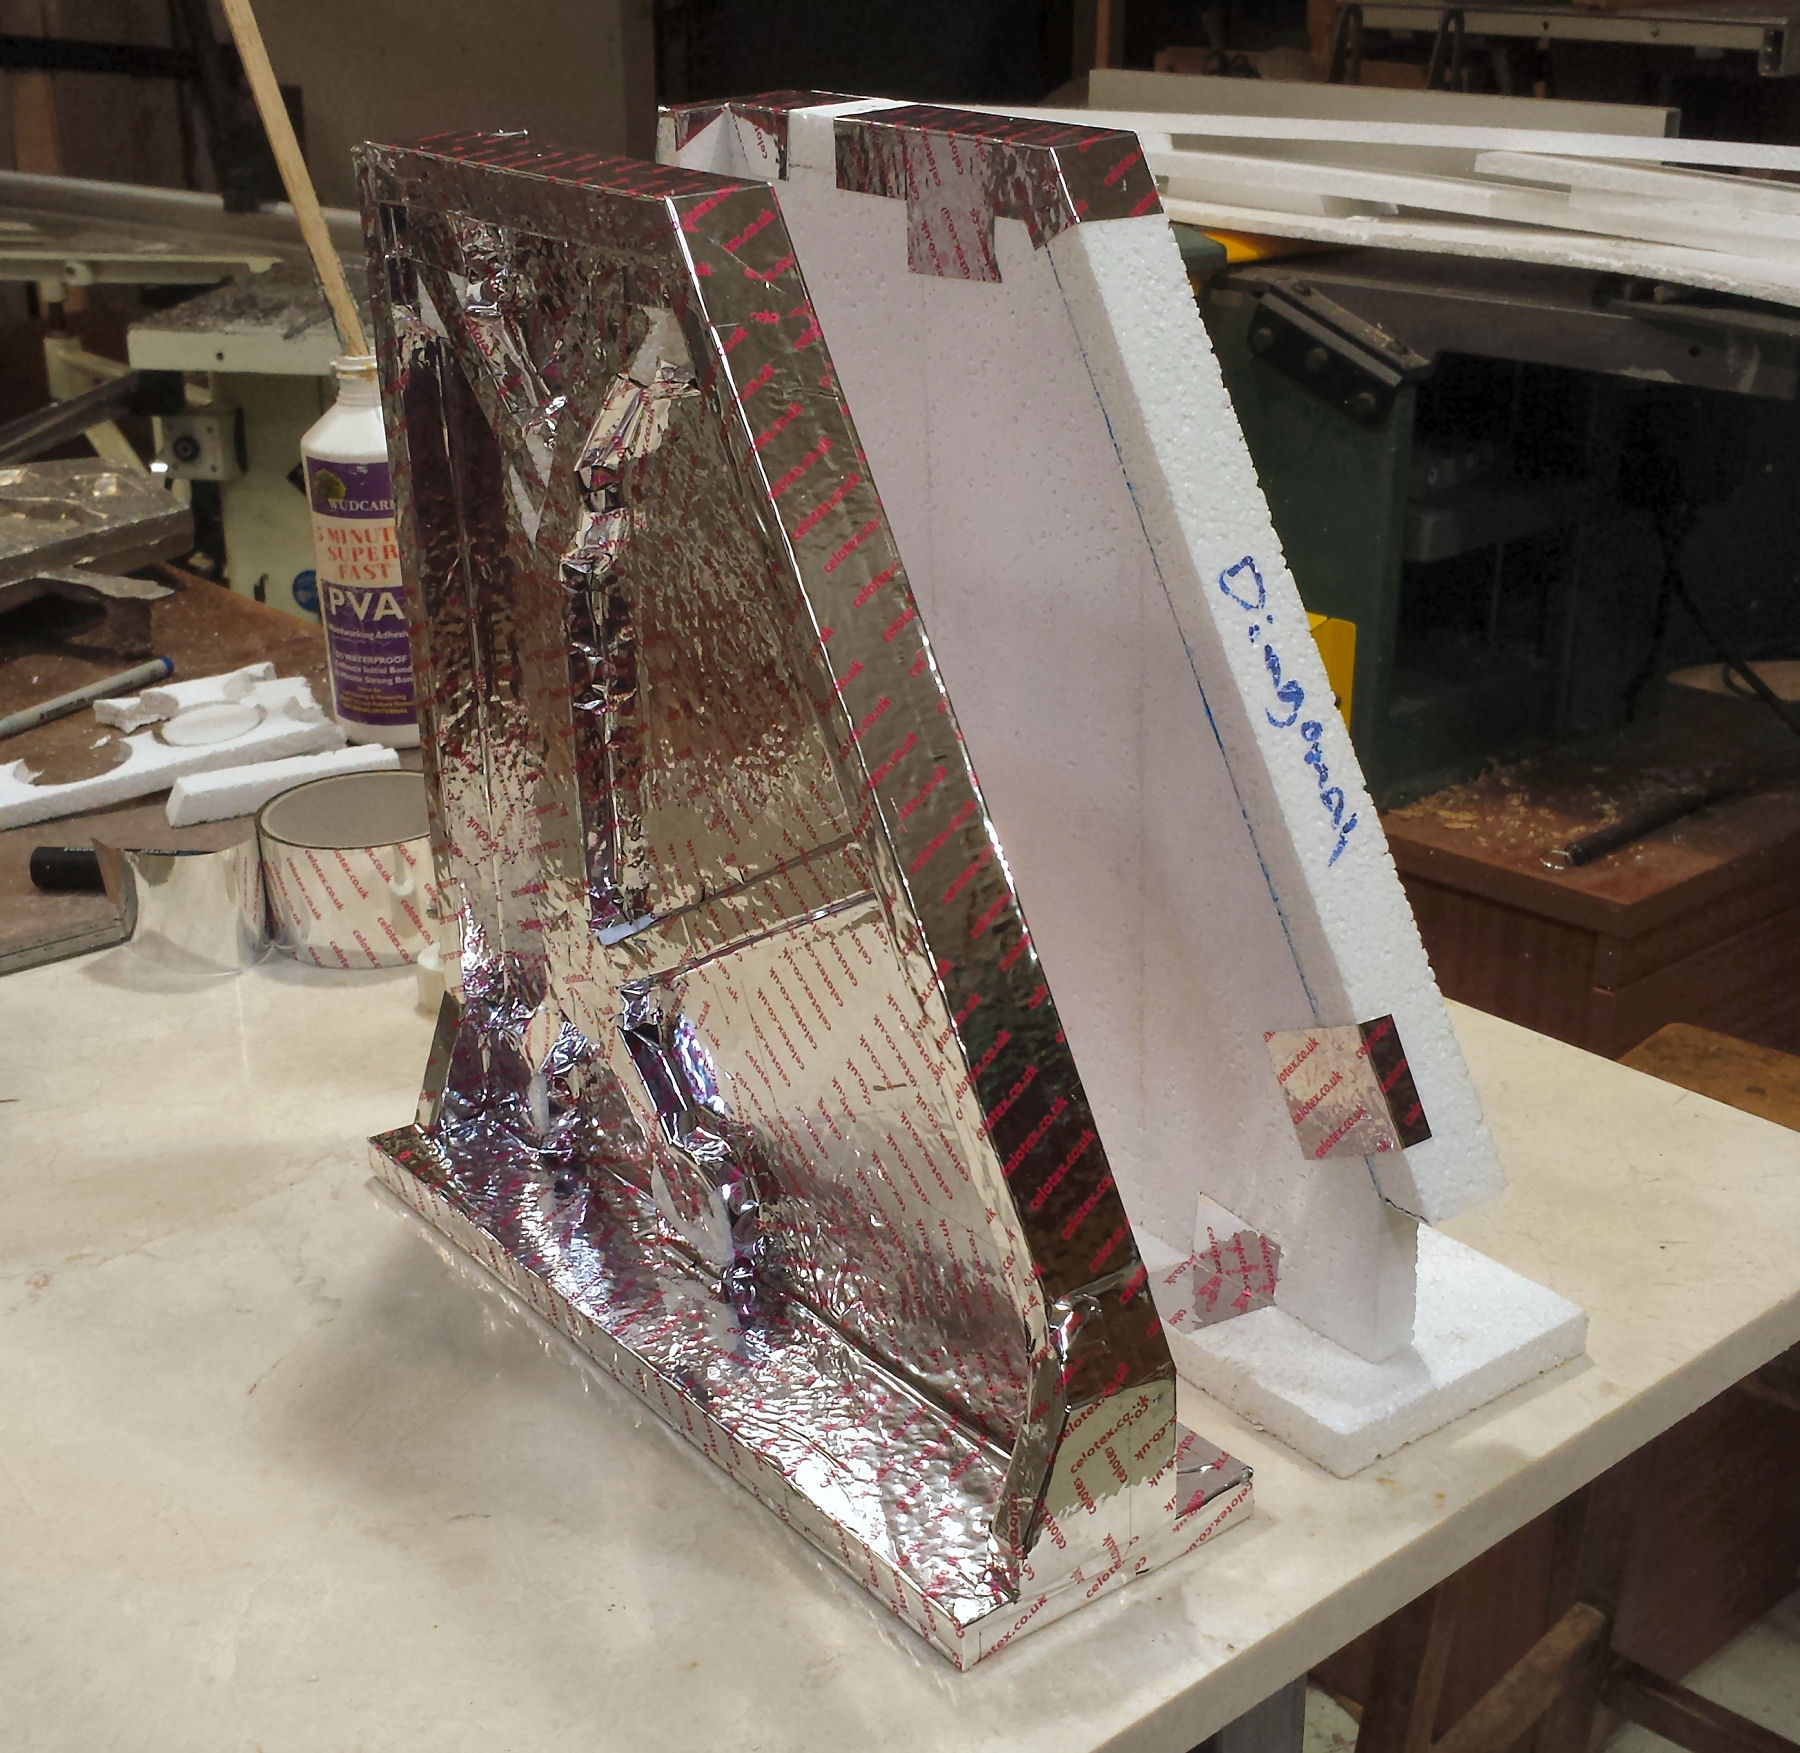
Though time consuming, foil tape strengthens the pattern significantly and also greatly improved the surface quality of the cast part.
Without the tape, the finished surface of a cast part is very rough, taking on all the ‘bobblyness’ of the foam. With the tape, and a coat of plaster, it is very smooth! It also has the benefit of creating a small radius on the corners, which is useful for reducing points of stress on the finished castings. In fact I would have liked to make larger radius fillets in some cases, and I see no easy way to do that with foam. I may be missing some great foam pattern making technique, but the ease with which you can fillet internal corners with a wooden pattern is a point in favour of green sand casting. Having said that you HAVE to fillet the corners of green sand patterns – it would be nice to have the option.
Into the sand
Unlike green sand casting, if you have used a plaster mix on the outside of your pattern, the sand can be plain unbonded sand. So right away that skips a LOT of time consuming prep work making green sand. You can just use regular dry builders sand!
One potential problem is getting the sand to fill all the voids and cavities on the underside of the foam pattern. To do this the sand needs to flow, kinda like how sand flows in an hourglass, and you need to vibrate the sand without causing damage to the pattern -this can be difficult. Potential methods involve rapping on the sides of the container with a hammer and vibrating with an orbital sander. Obviously, whether you need to worry about this will depend on the shape of your casting. In the video you can see how sand didn’t sufficiently fill the corner of my gantry end plate casting.
Pre-melting the risers
On quite big castings, like the gantry end plates I’m making, you can have problems with pressurised exhaust gasses pushing the mold out of shape. To help prevent this use lots of risers that gas can escape from, and BEFORE pouring the aluminium use a heated rod to melt out some of the foam from these. This gives the gas an escape route that wouldn’t otherwise exist. Some people use long drinking plastic straws for this, and that may work better than spindly plaster-foam risers like I used. If you watch the video and compare the difference between the first and second end plate casting, you will see how doing this, along with a slower pour speed, really helped prevent this gas pressure problem.
Which Method is best, Lost Foam or Green Sand?
Answer: it depends on the following questions in order of importance.
- How many of a certain casting are you making?
- What the casting shape is like, how big is it, can it have draft?
- How good does the surface finish need to be?
Green sand casting is somewhat cleaner, doesn’t smell so much, but leaves a rougher surface finish. I have experienced less warpage with lost foam castings which may be due to the moisture in the sand cooling some parts of the casting faster than others.
Green sand involves lots of sand prep work and a fair bit of ram up time, but you don’t need to wait for any plaster coatings to dry, as you do for lost foam. On the other hand you do however need to wait for paint on the wooden pattern to dry. AND wooden patterns are harder to make than foam (although bear in mind the point I made earlier about the corner fillets on foam patterns)!
To get a good surface finish on free foam (ie. styrofoam packing material), you have to use something like the foil tape or all the bobblyness is copied. You can buy high density foam that is designed for expendable pattern casting, but I have not tried it myself.
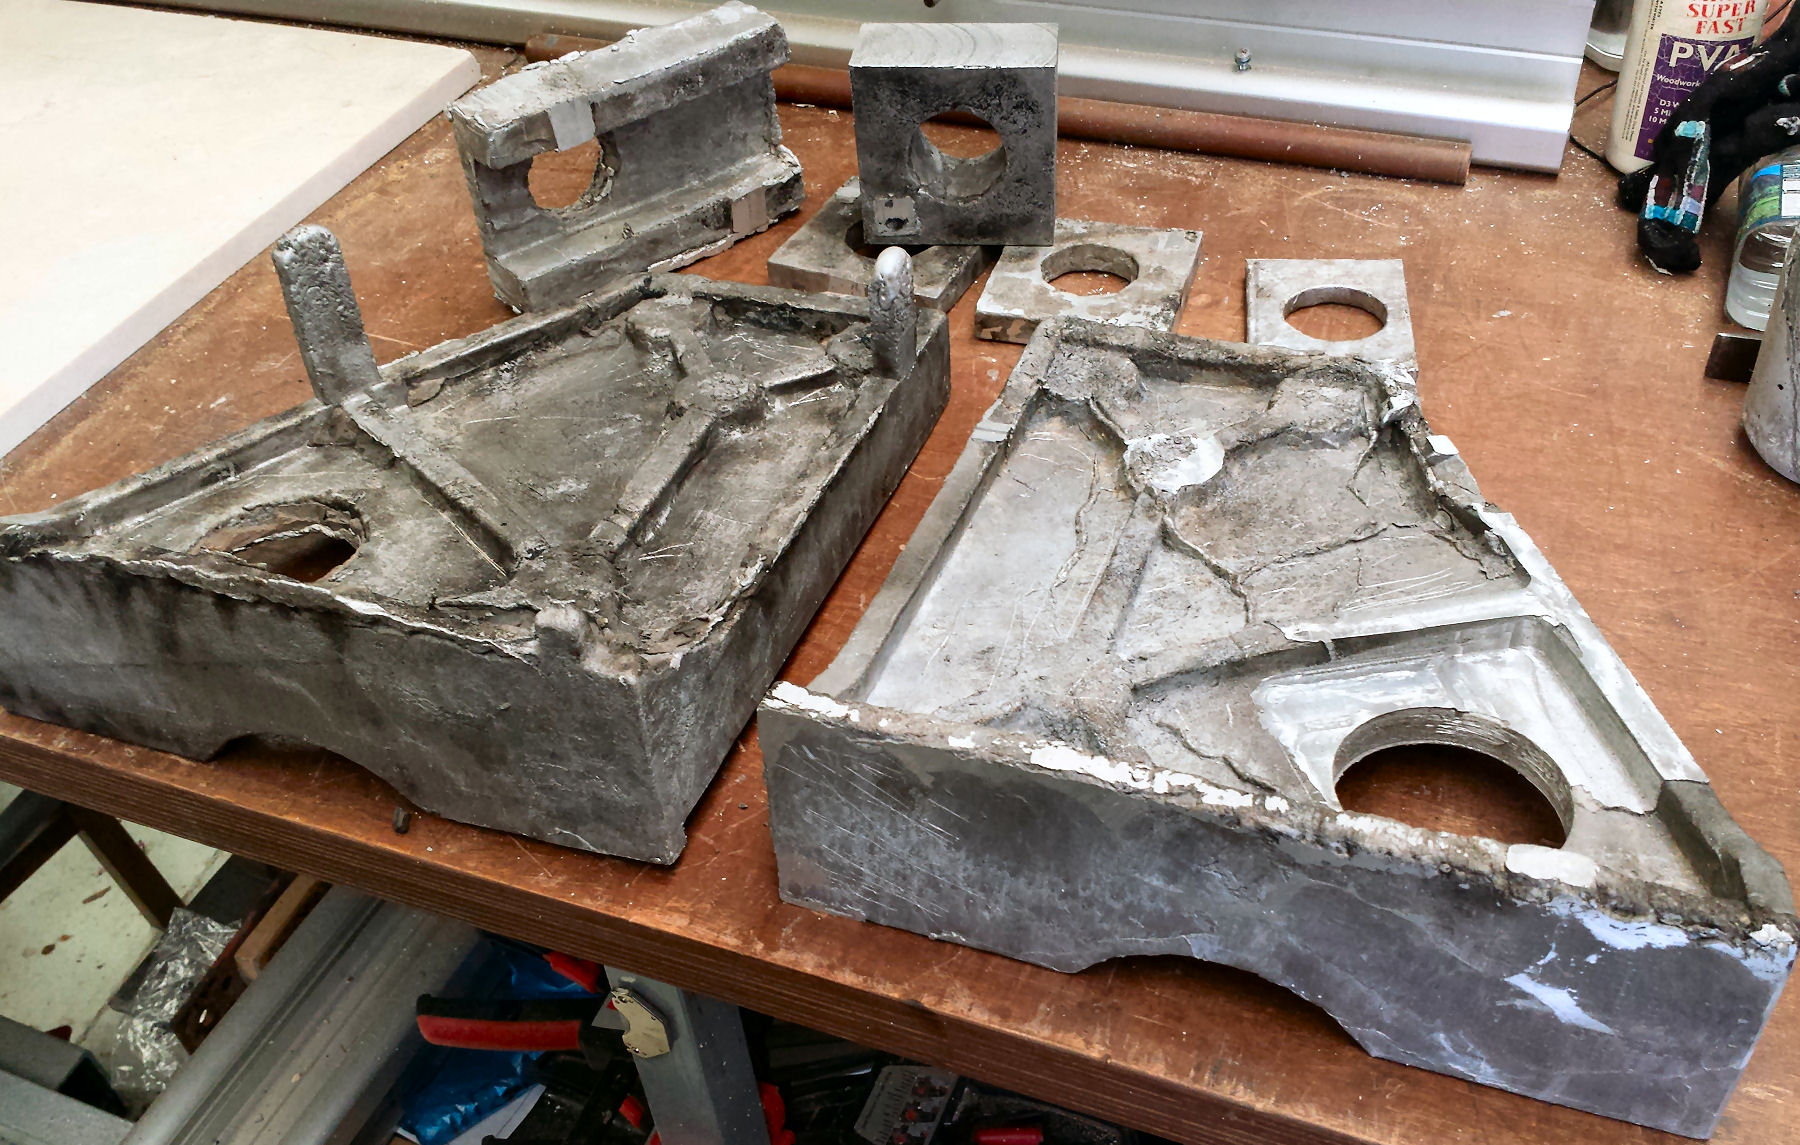
Some aluminium castings made with lost foam method. Top shows some bearing blocks, motor mounts and cover plates. In front are the two gantry end plates.
In sum, I prefer lost foam primarily because I am doing one offs, and the design is quicker and easier with no worries about draft angles. In both methods though, I think the key is to pay attention to details and build experience – if my progress is anything to go by, it is somewhat unrealistic to expect a perfect casting on the very first go. This makes the ones that turn out good all the more satisfying :) I hope that is of some use, I would love to hear your thoughts and experiences of casting in the comments section below.
| Tweet |
May 20th, 2017 at 5:52 am
So far the best green sand casting on youtube is done by Olfoundryman. Looks like he is making a living or at least a significant amount of pocket change using green sand. He does NICE work.
One nice thing about green sand is that if you screw up the cast you can ram it up again with less work then making a new foam pattern.
Regarding foam. I have seen people ram them up in a drag then use loose sand in the cope. Thinking is you need a solid bottom to support the molten metal. It makes sense to me.
Did not watch all the vids on foam casting As you found out solid foam vents have problems. Seen people using soda straws.
FWIW my casting experience is all with investment casting and decades old. Itching to give casting another go.
Howard