Making a Wood Burning Stove -3 The Burning Chamber
Beginning to Weld!
Ok so the weather is going bazaarly hot, what better way celebrate than by donning the welding gauntlets, sweaty mask and continuing the sideways-burning, self-loading stove project (see the first instalments if that makes no sense). We get the welding ball rolling by tack welding the primary and secondary burn chambers together.

Once we are satisfied with the position we can set to and try some proper welds. Here is the first weld seam, certainly not the best, but passable – as you can see I was stopping and starting and fiddling about with the welders settings for this one.

With burn chambers attached we can cut the hole for the viewing (and cleaning) window. Again, the masking tape trick is used to make a cutting guide on the curved surface. We have an idea about how we want the stove to be orientated, so with that in mind the window hole is slightly offset to one side.

As stove glass (which is a kind of transparent ceramic, rather than regular glass) that is curved is absurdly expensive and virtually impossible to get hold of, we need to make a flat plane for the glass and frame to fit to. Using some scrap metal, the shape is traced and cut with the jigsaw.

Once the top and bottom pieces are flattened out and cleaned of paint, we tack welded up the general shape like so…

Instead of having the window extend evenly out either side of the cylindrical shape, which is what we planned, by sort of angling it towards what will be the front of the wood stove, we could make the fire visible more often. It is not angled so much that you can’t use the hole to reach in and through to clean out and poke around in the secondary burn chamber though.
Once we are happy the seams are all welded up. We also weld on a reinforcing ring round the top edge of the chamber.

The door-to-be for the fuel storage compartment is shaped – making this fit is actually quite difficult: where the curved top meets the circle of the burn unit, it forms a complex shape… We sort of mark it as best we can using an off cut bit as a guide to get us close… Then holding it in place we can mark the bits that touch and grind them down till it fits snug and tight all the way round.

It is worth remembering that the ‘fire rope’ that will form the seal will stick out about 5-8mm (when compressed), so this will push the whole door out somewhat….
With the big door roughly fitting lets tackle the viewing window’s frame.
The Stove Window
The glass needs a square and flat frame to keep it in place, with a more or less airtight seal against the body of the stove. To begin with I cut and tack weld a simple rectangle of the correct size. To keep things square the assembly is tacked to some scrap plate metal that is reasonably flat. Without this, the frame could warp out of shape because of the heat generated during welding.

I didn’t have quite enough square bar in the scraps box so two of the edges are make by joining two bits together – a total of 6 small lengths making up the four sided rectangle (gotta love using scrap). Talking of scrap, lets get some rusty nails involved!

These are forming a rim around the frame, which will carry the fire rope seal. The procedure to prep the nails – grind off the nail’s head (quite quick with 1mm grinding disk), chuck the nail in the drill and use sandpaper to clean up while spinning. After some nail joining jiggery pokery this is what we are left with. The fire rope should fit in there nicely, but yes, joining nails is a lot like madness. Some other source of longer round metal would be good.
 A welding table is going to be needed in the future, hunching over on the hard floor gets painful after a while… Anyway, flipped the frame over we I put a bead of weld down and it looks like so:

It needs a fair bit of cleaning up, but has remained square and flat, and is the correct size for the stove’s hole. It kinda reminds me of a picture frame – Industrial ruin style collage anyone?

So with the fire rope fitting in there ok (thanks for the fire rope donation Dave), it’s hinge making time. The hinges for the viewing window are the perfect excuse to get the POWER hacksaw going, but more on that later. Anyway, some skip scrap is cut down to something that looks like it will work…

After de-rusting with the grinder we tack two of them on to the frame and use the hinge-pin to align the top and bottom.

I found the hinge-pin in an old scraps tub, is a steel rod left over from when I pulled a sewing machine apart to make a scroll saw. Actually, I had a few bits left over from that that I may use as engineering-geeky catch type parts… Anyway, once this is in position, we can tack on the remaining two brackets, and with the door clamped in its final position (with the fire rope compressed in place) we can drill through the two brackets in the door and into those on the stove.

And then…. A window/door thing that opens, wooooha! Now we have final dimensions and its working, it is time to order some ceramic stove glass.

Ooo, I almost forgot to mention: before welding the brackets onto the door frame I drilled and tapped some holes in the square section. These will be used to bolt in retaining strips (or little tabs – we haven’t decided yet) for the stove glass.
Here’s the current stove door latch idea, such as it is. A dumpster-dive hammer head, and left over cog from the sewing machine scrollsaw – a cerclip will retain the latch on its pivot, and the door’s compression can be set by putting washers under or on top. it needs a good sand down, but the shape of the hammer-head, tends to compress the door tight as it shuts, witch is good..

The stove’s wood loading door
The fuel magazine door, ie. the door we load the wood in through, is a little more tricky to seal. It is sealing against a compound-curved surface at the top, and a slightly dented and irregular surface along the main body of the cylinder. So all in all, quite a task. One which will require a fatter glass rope seal to take up some of the irregularities. We started by welding (and bending) on some 10mm round bar, to act as retaining strip for the fire rope.
Have you tried making a precise compound curve in 10mm thick steel? Tricky. Here’s how we did it: begin with lots of fiddling about getting the cylinder door to be exactly where you want it and then lock it in position with a few tack welds. Now starting at the top, we weld the first few cm (inch or so) of the bar to the main cylinder then immediately after, bend the bar round the compound curve. The bar bends quite easily because it remains very hot from the weld and you have leverage on your side. Proceed in this way centimetre by centimetre, weld bend, weld bend, until the curve is complete :-D At this point you need to grind the door loose while you can still get to the tack welds (or it will be stuck forever). After that, the straight bit is just a case of regular welding. It is quite a long seam, and in retrospect, it is probably not really necessary to weld it all.

Again, it would be nice to present some lovely finished welds, but for now at least it all looks quite scrappy and industrial. It should clean up ok though. With those retaining bars in place lets look at mounting the actual door on hinges. The first thing to do is to temporarily stick on some sample glass rope seal bits, so we can see exactly how the door sits.

Do some more fiddle-faddling to get the door sitting exactly as required and clamp!

Now we cut some hinges to size from some chunky scrap metal bar. At this point we simply have to unleash our own steam-punk museum style automatic hacksaw (which we obviously had to tinker round with to get going before we could proceed). It was retired from Aberystwyth University’s maintenance department, where it had been in storage for several years…

We will have to get a video of it going up here in the next instalment, because a photo just doesn’t do it justice. With a new HSS blade, some re-wiring and TLC, it actually makes quite a nice cut, in not too much time, without much noise. Plus it is just plain cool to watch it going back and forth while eating sandwiches.
Anyway, once the magic hacksaw is done making our hinge brackets, it is drilling and aligning time. I imagine a magnetic welding square jig thing would have been very useful at this point (and a few others too), but we scraped through with a regular square.

Once it is square we weld that one up, and then align the next hinge brackets to have matching angles like so…

That is welded on and we are ready to test it out, which is oddly exciting.

Ok the 12mm round we planned to use as the hinge pins was actually nothing like round, so will have to go on the lathe before we get a real test. In the meantime, I used an odd bit of something from the scrap box and the 12mm drill bit.
At full extension, which I don’t imagine will ever be used the door sticks out far enough to unbalance the whole stove (eek!). So some swing limiters, stabilising feet or some bolt downs will have to be made eventually.

Looking at it, I also decided that the leverage on the hinge was enough to justify a bit of reinforcement. More work for the magic hacksaw :)

So that’s about where we are up to with it now (and you thought this post would never end!). We have yet to install the glass rope seal for the big door, it looks like it will seal quite well onto the main cylinder, but…
Design issue to ponder at the moment is, how do we seal the bottom of the door, where it meets the combustion chamber, here??

Originally I though I would just have an overlap on the bottom of the door that retained a bit of fire rope seal. That won’t work as the overlap will snag on the combustion chamber, preventing it from opening or closing. This is because the door is more than a semicircle. I hope that makes the problem clear?
Update: Ok have this sorted, I added two hinged flaps coming from either side, which tension together in the middle. The flaps retain a rope seal that covers the bottom joint. Bit of a fiddle faddle, but seems like it will work.
Ok, back soon with another instalment, in the meantime any comments or ideas are very welcome!
| Tweet |
March 31st, 2012 at 10:34 pm
Seems you have been busy!
Would an internal flange on the lower piece of stove be possible, with a fire rope seal that the door would press up against?
March 31st, 2012 at 11:31 pm
Ah, that was original plan. The problem is that the door will not slide over at either end if you imagine this is a top down view:
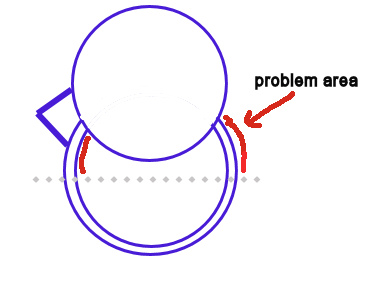
So without the metal bending there is no easy way to open and close. It could seal against the rim as you suggest, but only below the dotted line, above that it wont open or close. I am tempted to try using the spring of the metal to overcome this problem (a single overlapping skin of the 2.8mm) springs over and back fine) – but I am not sure how long it will retain its elasticity with all the heat cycling it will be getting?
April 1st, 2012 at 6:43 pm
Wow Bongo, you make me feel kind of a cheat for just buying a wood burning stove. (A nice Timberwolf unit from Canada). Just installing that was a lot of work…
Keep up the good work, you inspire me to go and play in the garage and fix stuff.
Chris.
April 1st, 2012 at 6:52 pm
Ok problem makes visual sense now.
Hmm, solutions are forming in my mind involving sliding seals. From the dotted line I imagine seals moving towards the burn chamber running in slots and then tigterning in place forming the seal. make sense?
Hello Chris, I am in need or a nail gun, much shed demolition/construction is afoot.
April 1st, 2012 at 10:19 pm
Hay thanks Chris! Just buying one is good too, and you installed it right, so that’s cool. This one is kinda an experiment anyway (though hopefully it will be super efficient and all that), so more of a workshop stove…
Oooo, shed demolition, how exciting, why wasn’t I invited?!
Sliding seals… sort of makes sense, I was also thinking about maybe one sliding down from the door… Not sure? Needs a drawing session perhaps. Will have to have a fiddle about when I get back to the ‘shop tomorrow.
April 5th, 2012 at 9:45 pm
Yes sliding down from above will make more sense and give more room for the mechanism to tighen on the seal as well, are you thinking of a 2 or 3 point clamp/nuts/clip/bolty solution?
Yes shed is dead, you weren’t invited as it was a last minute decision at the end of the day, will post a photo or 2 tomorrow for design consultations
May 21st, 2014 at 8:18 am
can you guide me on how to put a glass observation portal in the first tank that will be the in-feed tube