Stove Air Supply, Flue and good Draw
The stove is burning away as we write this, making for a nice cosy workshop :D There have been a few problems though and a number of modifications since we first got it going. Most irksome amongst these was smoke escaping into the shop space – not good. Anyway, we’ll come to that, first lets have a quick look at the finishing bits of the installation. We have some primary and secondary air supply piped in from outside. And we have fiddled about with the injection location of this air a fair bit. In the video below it is as it was when we lit it for the first time.
In the vid you can see the two primary combustion air supply pipes, the one on the left comes from outside, down the secondary combustion chamber (for pre-heating). The smaller pipe on the right comes from the bottom back of the stove and runs through the sideways burn chamber for a little preheating. The problem with the pipes were that they held bigger sticks (and smaller ones in the wrong place) off the bed of hot embers. Logs suspended thus, didn’t seem to burn too well, as the air was directed away from them.
New Primary Air Supply
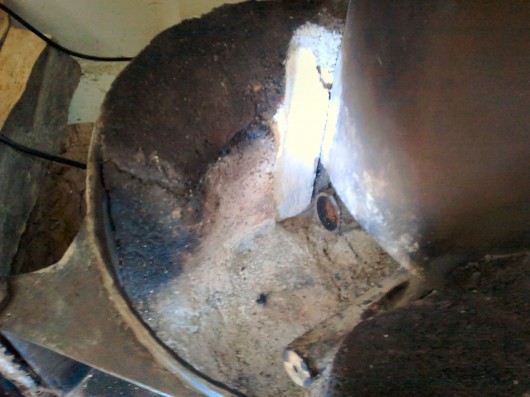
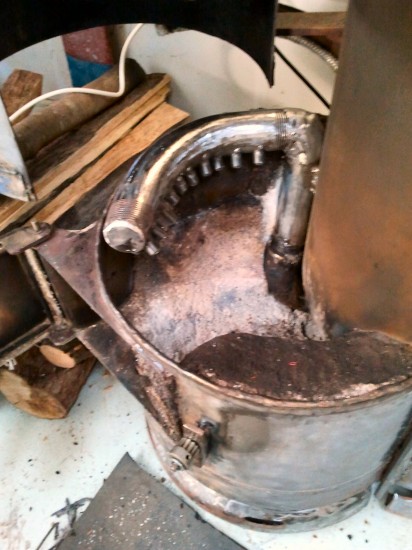
So we went about cutting into the lining so we could set back the pipe on the left (the bigger one) deeper into the side of the burn unit. Below you can see the burn chamber: we have cut the pipe back and hacked a vertical channel for the re-rout. You can see the white insulation brick under the layer of abrasive resistant lining.
From here we wanted to try adding proper nozzles to give the air a bit more velocity (high velocity air gives you a better burn by mixing up the combusting gases more thoroughly). We also wanted them to direct the fire downwards and back the way it should be going – not straight up!).
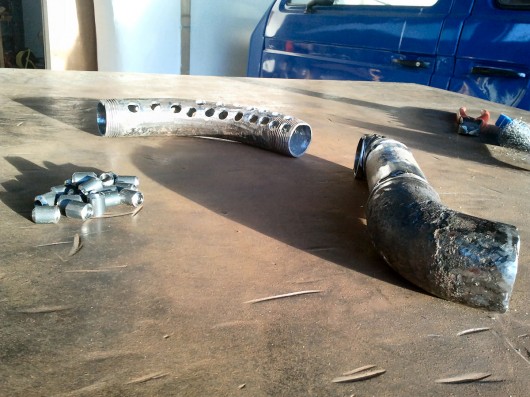
So back to the welder, grinder and drill… The pipe was tacked together and drilled ready to accept the nozzles you can see on the left. These we made on the lathe from some old solid steel rod. The pipe is the very last bits of scrap pipe we have: it was left to last because it required a fair bit of cleaning up with the grinder and flapdisk.
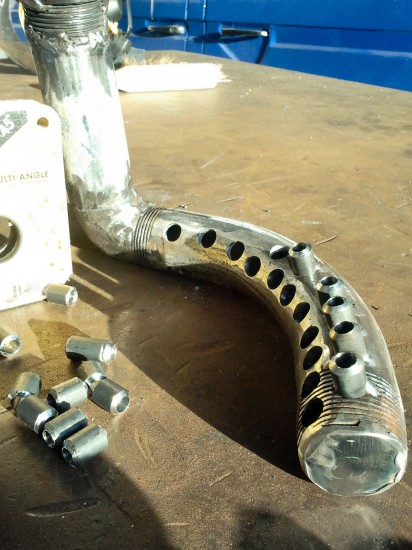
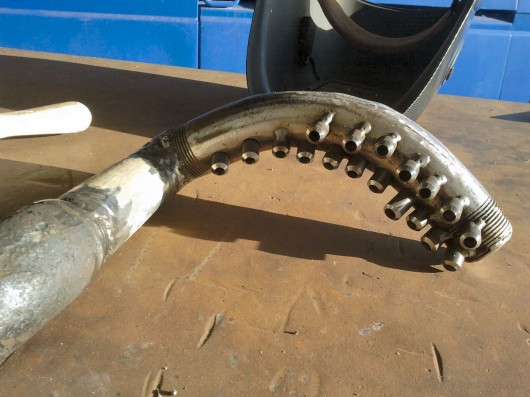
Carefully tack welding the nozzles in position and capping the pipe end so the air is forced out the nozzles. Feels like we are making some kind of sea creature…
Now putting this in place and attempting the super awkward in-situ weld to join it to the original cut off pipe.
The Flue Pipe & Fan
Lets talk flue pipe for a moment. So ideally we wanted to be able to run the stove with or without a fan to aid in the extraction. Burning wood without a fan is problematic for our design though, because our big heat exchanger extracts so much of the heat from the air it tends to loose its impetus to ‘draw’ up the flue. The hotter the air the faster it rises, but air that has given up most of its heat into the heat exchanger will sit still, unless it is pushed up by the air behind it (the secondary burn chamber and insulated flue above the hot plate give a reasonable amount of draw).
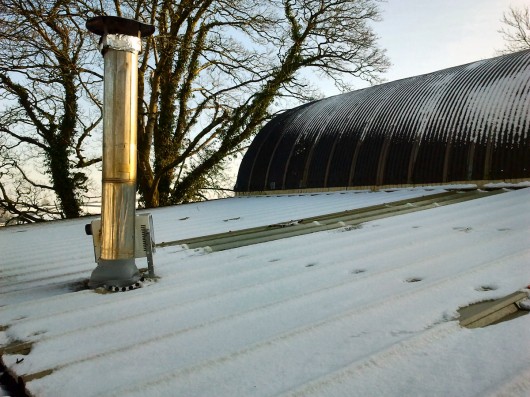
As the air has lost most of its heat by the time it exits the heat exchanger there wasn’t much point in having a big flue pipe above the roof. We went for this height anyway, because we had salvaged the insulated pipe so may as well use it.
We used the stove for a month or so with this flue only setup (without fan assisted love). The draw was ok on windy days, and the downwards burning unit would work as designed. But on still days, we would get a reasonable amount of smoke coming out the stove every time we went to re-load some wood. This was horrid.
The current solution is to suck the exhaust gases out with a old 45watt boiler fan. This is housed in a modified scrap microwave shell, to give it ventilation (to keep the motor cool) but keep things dry. A pipe connects this to the side of the flue and draws the gasses out.
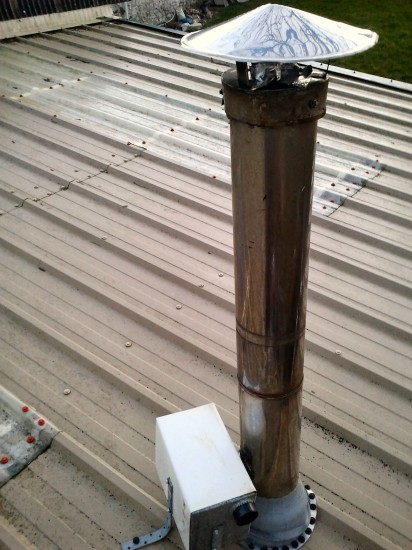
The only problem with this system is that we can’t easily switch from using the fan to not using it, because for the fan to work properly you need to block the top of the flue pipe (you can see in the pics we are using some kitchen foil and aluminium tape for the ‘testing-blocking phase’). If the top of the flue remains open the fan just sucks air from the top of the flue down and out, instead of sucking it up from the burn unit.
So the challenge now is to make some sort of weather-proof automated shut off for the flue: when the fan is turned on, we need the top section of the flue to close. When the fan is turned off, the top part of the flue needs to open… Ideas?
General Wood Burning
In general the stove is heating the reasonably big workshop space admirably. With the modifications it can now get us to a nice working temp (18C) in about 30 mins of being lit. So long as you keep the fuel coming it keeps getting hotter inside, even when there is snow outside. It’s probably not in its final incarnation, but so far it’s doing a really good job, and we don’t want to take it apart to fiddle as it’s so cold without it…
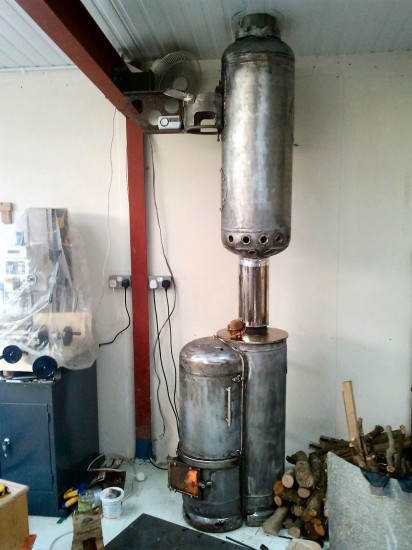
Above you can see it in action – that’s a pine big pine cone on the hotplate (its fun to watch it open up with the heat- and it smells nice). We have a carbon monoxide monitor/alarm (the white thing) resting on the heat exchanger bracket. This gives a digital reading of the CO in parts per million (it hasn’t been above zero, even when we have had visible smoke coming out…
There is a temporarily rigged up desk fan (50W on max speed) blowing air down and around the heat exchanger (top left in the pic – behind and above the heat exchanger mounting bracket). Having this on makes a huge difference to the speed with which the stove heats the room. This ‘forced-convection’ improves the even-ness that the heat is distributed, helping to prevent the heat accumulating in the high ceiling space. It also lowers the surface temp of the exchanger, thus increasing the rate at which the exhaust gasses will impart their heat to the inside face of the metal…
Future Improvements
A few improvements to the heat exchanger might be to add more fans to blow air through the inside cavity – in through the top and out through the holes in the bottom. Painting the exchanger black or another dull dark colour – though we are undecided on this. It is hard to tell how much this would improve efficiency but we doubt it would be that much (?) and we have become fond of the shiny Futurama spaceship look. We always intended to paint it, but then originally we thought it would very rapidly rust and look rubbish, but a few months on and it isn’t looking too shabby. Maintenance of the shiny surface would involve a quick sand down of any light rust, which might be preferable to a periodic chemical coating (re-painting). Either way the burn unit (lower half of the stove) would want to stay shiny, so as to help with the super insulation of combustion chamber[1].
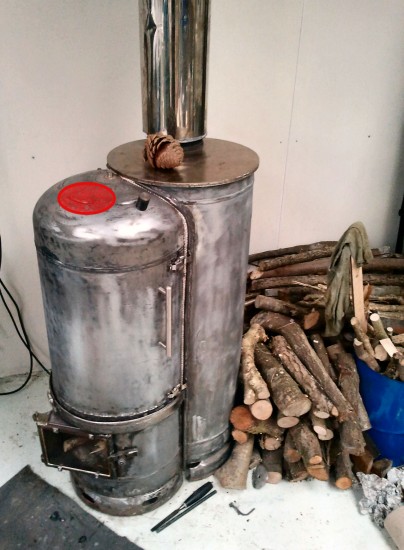
Another planned improvement is to add a hatch to the top of the door, where the red spot is on the pic. This would allow top loading, without swinging open the whole door, and more importantly allow us to load in really long branches. Longer branches would mean longer times between having to fiddle with the fire. It would also mean less firewood sawing, though they might be a bit more unmanageable to store and transport. We are also considering a funnel feed that would allow us to feed in wood shavings and sawdust, which could gasify and burn – anyone got any tips/know of any examples of this?
Finally, we still want to add a bit of tech geekery to the whole thing: with some oxygen sensors placed in the flue we could adjust primary and secondary air supply accordingly, perfectly meeting the oxygen requirements of combustion without oversupply, which cools the burn. Combined with an arduino, some temperature sensors and an LCD display, we could see at a glance the health of our burn. We could even get the arduino adjusting air supply automatically with some servo control.
So yeah, that’s the stove thus far. Its nice and warm and uses wood scraps we accumulate from projecting, and sticks we get from woodland management and hedging on the farm :) We do need to consider some sort of solar kiln, possibly a duel purpose timber and firewood drying thing… anyway that’s definitely for another post.
- [1]Before black became the ‘in’ colour for stoves it was common practice to chrome them- the shiny surface reducing the emmisivity of the unit and enabling a hotter burn.↩
| Tweet |
February 15th, 2013 at 2:56 pm
Hi – love your experimental stove. You are totally right separating the combustion from heat extraction. Have you thought about using water in the top section with a thermostatic valve to maintain the water temp? You could just use a simple copper coil with a pump. Switch the pump when the outer of the top section reaches, say, 45ºC, or use a spare solar controller to switch when flow exceeds return by 4ºC?
That top section is likely to get tarred up and have mini chimney fires in it so, in case you hadn’t thought of it which you probably have, i wanted to say that it could get to 1000ºC plus when that happens – so you might want to make sure that there arent flammable things near at all to it.
To improve draw – other than increasing the chimney height you could simply put in a bypass so that the smoke can go straight up when the stove is cold, the switch it over when it is nice and hot. An improvement would be to make this open up when you open the door, or to make it thermostatic.
You do get inline chimney fans that do not block the flue by the way….we use them on log gasification boiler systems.
I have always wondered about automating the air supply ratios during combustion. At the end of the cycle its charcoal with the reaction happening on the surface of the fuel. In theory at that point the fuel wants primary and hardly any secondary so the secondary….
Anyways nice stove experimentation – good to see some people with active brains out there!
Cheers
Sune
February 15th, 2013 at 3:45 pm
Hi Sune,
Thanks for the thoughtful comment. We kinda discarded the idea of using water to shift the heat about because of the extra complexity (and cost), but maybe in the future some time…
We knew you can get in-line fans, but again the cost – I think the system we have going now is very close to being seamless – we just need an easily controllable shut-off to the flue’s top section (after the fan).
Agreed about the tarring of the heat exchanger – it shouldn’t be a big problem, and an exciting boost of heat for the room if it catches ;)
Cheers,
Bongo.
PS awesome to have some positive feedback from someone in the trade (we used your website’s Kilowatt calculator when thinking about designs), all too often we encounter the “leave that to the professionals, and stop thinking for yourself before you kill everyone you have ever met” mentality.
January 7th, 2014 at 12:50 am
Hi,
I was thinking of building a stove with similar design features. I have a few questions:
How long does a full load of wood burn before reloading the stove again?
Is the wood metering system works as it supposed to: burning only at the bottom and feeding required amount of fuel by its own weight?
Did you ever had a situation when fire went up the wood in to the load chamber, where it should not be (dangerous)?
Instead of building your own heat exchanger and messing with fans, I think it is possible to convert an old high efficiency natural gas furnace for this purpose. It’s got everything you were aiming for: multi-stage heat exchanger, flue fan, main blower fan, condensate collection system and best of all efficiency well above 90%. The exhaust gases should be about room temperature so small plastic pipe can be used as a flue.
January 7th, 2014 at 1:53 pm
Hi Michael, nice to here from you.
Q1. Is very dependent on the type, diameter and moisture level of the wood we load. Obviously thin sticks of very dry softwood burs much quicker. We have been burning a lot of ash, some split from large logs some in the round, from about 3cm to a max of about 8cm diameter. A mixed full load takes from about one and a half to three hours to burn.
Q2. In general the wood metering system works exactly as it should, but…
Q3. Yes we have had an occasional ‘up burn’, when we put in exceedingly dry thin wood. There are various reasons, and possible solutions for this, which we may blog about in the future… For the design we have, this ‘up burn’ is in no way troubling, as the fuel compartment a sealed 3mm steel container – the exhaust gasses still have to go down and out the flue. It poses no dangers, unless someone opens the hopper without looking at the state of the fire through the window first (which we never do).
The use of an old gas furnace sounds intriguing, and worth investigating. My initial thought is to wonder if the design of the exchanger will work with wood exhaust gasses – presumably it will have been made for a clean burning fuel (gas). There is likely to be creosote deposited at the beginning and end of wood burns. That’s not to say it cant be used though – just a consideration.
In terms of the plastic exhaust pipe – doesn’t seem like a good idea to me. The burn of the gas in the original furnace will have been very well controlled and temperature regulated. Something that is much harder to do with wood burners (especially experimental ones!). I would suggest it would be wise to air on the side of safety and use metal for the flue, at least until you have played about with the proposed system, and monitored the temps at various places for a season’s worth of burns.
Any other questions just ask. I would be very interested to know how it goes if you go ahead with the gas furnace mash-up.
May 20th, 2014 at 2:26 am
Is it possible to send me the detailed sketch that you used? I am trying to build a stove simular to this. I have a unlimited supply of 100 pound non certifiable propane tanks and a sheet metal company that helps me out providing I take them a case of beer every so often. So far I have extended one of the bottles by about 12 inches. In the bottom of the first barrel I have made a small holed screen and about 2 inches above it another screen made of expanded metal. Both will be remove able for ash clean out. I was planning to utilize a 1/4″ x 5″x 7″ box tubing for the fire and heat transfer item to the main upright tube in the second 100 pound propane bottle.
my two tanks will not be connected as the first tank has 3 pieces for removal for maintenance such as ash clean out. I was going to use a 5″x 5″x1/4″ box tubing. Insulating it and using the third tank by cutting a middle section out and squeezing it to fit with a banded apparatus. This time my top clearance will only be 1.5″ instead of 2″ as I cannot get my 1st stove to gain over 225°farenhieght.
Any suggestions that you can give me sure will be appreciated. As I am recovering from chemotherapy and all the emergency operations caused by it I can only work a few hours every other day or so.
many thanks.
May 20th, 2014 at 8:17 am
Hi Thomas.
Great to hear from you. I struggled to follow your description, is tricky without a diagram.
All the sketches I used are on the website here. See http://www.floweringelbow.org/2013/wood-stove/making-a-wood-burning-stove-6-heat-exchanger/
Clicking on any of the diagrams should bring up a larger version :)
You should be able to go way past 225F, so not sure whats happening there – what kind of wood you burning?
What flue pipe are you using? It is beat to maintain the same possible flow throughout the stove – ie. ideally from the burn chamber onward the cross sectional area of the adjoining passages, flue pipe, heat exchanger, final flue, should be the same. Obviously she shape will vary, but aim for the same gas carrying capacity.
Does that help any? Would love to see a diagram of photos of your setup :)
May 27th, 2014 at 5:35 am
wondering how what dimensions you used for the fire box?
I am doing my best of trying a very similar idea. but when it comes to using a 100 pound propane tank as feed chamber did you funnel it on the bottom?
If you can send me a diagram —Much appreciated
Thomas Russell I am in the learning stage
February 24th, 2015 at 6:25 pm
Hi there,
Just come across this site and have read with interest your trials and tribulations with the stove. If you haven’t already successfully modified your flue when using the fan assisted extraction, you might like to try using the fan to blow air into the flue (at its original position. Drill into the flue and insert a 50mm(?) pipe so that it is angled up to the exit. When the fan is operating this will create a venturi effect and draw the gasses upward. There will be no need to have any closure device at the top of the flue. HTH
March 16th, 2015 at 1:24 pm
Nice builds. I’ve discovered your site through instructables, your lathe post to be exact. I too built a stove to beat my studio this winter. I built a cast ceramic “rocket mass heater”
Style. For a heat exchanger I built a brick “bell”, similar to a Russian stove, to capture as much heat as possible. I am really happy with it. I too struggled with back drafts when loading, increased flue size and additional chimney height helped me. I’ve gotten such a great exchange of heat that I’ve been able to use plain galvinized vent pipe, the exit flue never gets above 190F (80c). Very efficient, uses about 12lbs of wood for a four hour burn.. I can put whole branches in the burn box but found that splitting them seems to get them to burn more efficiently. Keep up the good work!
March 16th, 2015 at 1:51 pm
Unfortunately you will curse the day that you spent so much time building this out of metal. I ignored their suggestions as well and built a roaring RMH. It doesn’t last more than 600 burn hours. Ever heard of steel an ealing that’s what will happen.and you will burn through in your J tube.
Next time I will listen and build out of good fire bricks only.
April 6th, 2015 at 1:54 pm
Hi Thomas. If you check back on some of the design & build details you will see the hottest parts – the combustion chamber etc. – are lined with insulated fire brick. The metal itself doesn’t get too hot. The only metal bits that get brutally hot are the hotplate (thick stainless (would go standard mild steel if I was making again) and the heat exchanger. So far both seem fine after a few years use. The 3mm thick steel that gas bottles are made from is quite durable – and very cheap to replace after ten or so years if necessary.
May 26th, 2015 at 3:38 pm
I find myself on your website from time to time looking at things like your cyclonic dust separator and wood burner. I have built a wood burner, greatly influenced by your design and experience. I have plans to build a cyclonic separator too.
Thank you for taking the time to share your experience with us. It’s so valuable to learn from someone who has tried it before and knows what works. Especially when you say what didn’t work. It stops me from making the same mistakes.
Keep up the inspiring work!
May 26th, 2015 at 9:25 pm
Hi Ben,
Thanks for the encouraging comment. Would love to see some photos of your stove :)
Bongo.
May 27th, 2015 at 12:30 am
I am in the process of Taki g everything apart. I will post conditions of the working parts of the Rocket Stove at a later date. I will advise all that even though I am a certified Welder right across Canada that I will admit that my next Rocket Stove will not be made of any thickness of iron as it disinacrates as it travels between extremely heat and the cooling cycles. I would only re-build with “fire bricks”.
Will keep you posted
January 25th, 2016 at 11:31 pm
A combination, as in what I did here, with insulated fire bricks, castable refractory and metal works quite well to make a durable stove.
November 27th, 2016 at 4:23 am
I’m impressed with how well you thought out this design. It seems like you tried to capture the absolute most amount of heat in your shop, and send the least out the chimney. All the while still having an efficient burn. One question…. Since you have had time to use the stove, do you think you “over-engineered” the design? For a lot of folks wood is either free or cheap, and of course it is a renewable resource, also for many it is readily available. By making the stove a little less efficient…. With a better draw….. and hotter flue temperatures, many of your headaches would be solved. Do you wish it was a simpler design, and just burned more wood?
November 27th, 2016 at 8:14 pm
Hi Jake. Thanks for your thoughtful question. I must admit that I love the minimalist stoves that are simple and elegant. Unfortunately they also tend to be designed without much mind for heat exchanging efficiency. On the plus side, they are cheap and don’t require an electric supply of any kind.
However…
No I don’t think it is over-engineered. There are a few things I would change if doing over, but the time I have saved in processing firewood alone makes the design worth the trouble it was to make. I love that I can put long logs on and let them burn for quite some time. That fits the way I work in the shop – I can’t be adding wood to the stove every 20 mins or so, that kills the ‘making stuff flow’. Also, it just works! It heats the big space of the shop up quite quickly…
So yeah, if I was doing it over again I might go for something even bigger – even more of a batch burner. I might even have sited it outside the workshop in its own little lean-to, and piped hot water in.
Recently I have been thinking of adding a propane jet, to start and end burns, so as to eliminate any incomplete combustion (reducing pollution and creosote build up). Probably wont though, just for safety/ complexity-reduction reasons, but in theory I like the idea. Have been thinking on this in relation to the propane furnace I made to melt aluminium. Will bolg about that in time.
Thanks again for the question, B.
March 25th, 2019 at 1:26 pm
Just wondering how well the metal has held up as most metal rocket stoves burn out with the high heat. Was wondering if fire brick lining might be a good upgrade?