Quest for the Quietest Bandsaw
Update: you can now check out a video of my 10 year quest for a better bandsaw here: https://youtu.be/WmfpUttxdL8
Why want an especially quiet bandsaw? To start with, it’s just more human friendly to use a machine that is not screaming away while you are trying to focus on doing good work. We might also want to consider neighbourly angst levels – if, like me, your paranoid you are annoying everyone in a mile radius, and making the dogs howl with displeasure, you will not be getting good bandsaw using vibes.

“Noise causes stress: the onset of loud noise can produce effects such as fear, and changes in pulse rate, respiration rate, blood pressure, metabolism, acuity of vision, skin electrical resistance, etc.” (Bies & Hansen, 1988 page 152[1]).
Why else go on a crazy quest for not just a quiet bandsaw, but the quiestest bandsaw? Well because we know that any noise coming from the saw is a symptom of something else: shoddiness. That is, vibrations, poorly running wheels, ill-fitting belts, wibbly wobbly blades, and ultimately shoddy cuts in our wood. So by minimising noise, we are not just improving our audio experience, but raising the level of bandsaw performance overall. With this in mind, lets look at three main areas that can be improved upon on almost any bandsaw.
1. Sawdust, Know Your Place.
As regular readers will know, the exampled bandsaw, that we are working on is a second hand Elektra Beckum BAS 500 WNB. This is not a cast iron bandsaw, but one of the welded steel types that have become very popular. In fact, it seems that there are a number of very similar machines, with only superficial differences between models from Elektra Beckum, Record Power and Axminster. 
Although manufacturers can achieve the required strength and stiffness with less material using sheet steel construction, the problem is that steel transmits vibrations very well, rather than absorbing them as cast iron tends to. To get around this problem, manufacturers claim they spend more time meticulously balancing the drive pulleys and bandsaw wheels (which are also typically not cast iron in these machines, but aluminium), supposedly dynamically balancing them to within 0.2 grams (but the cynical amongst us might question whether they actually do this on anything but special travelling demonstration models).
Either way because the dust extraction design is so poor, all that fictional balancing is effectively wasted after the first ten minutes of use, as dust finds its way into the corners of the wheels where it becomes trapped by centrifugal forces and puts everything out of balance. After a little more run time it also finds its way into the balancing holes (if the wheel has them), onto and into the guide bearing, and finally into the main bandsaw wheel bearings. So as well as being a serious concern for health reasons (for more info on that, checkout the DIY cyclone project), the dust created by bandsawing also quickly sabotages our saw’s ability to cut quietly or well. In other words, uncontrolled wood dust = noise!
As usual, the the key to good dust extraction is to collect from the source, which in this case is as close to where the blade exits the wood as possible. So forget about trying to use the ill placed extraction port that comes with the saw – to make this work well you will need a hugely oversized dust extractor, which is a crazily inefficient use of power. Instead, it is possible to use a decent shop vac or extractor, assuming you are separating off the dust with a cyclone (We use the ‘dust sniper’- two household vacs, each with a cyclone).
After various experiments we have just about settled on a ‘two chamber method’. Basically, we create a sealed off chamber around the blade, directly under the table, from which we pull dust. And then another below that to catch any dust that somehow escapes the first trap. The idea being that by putting brushes in the sawdust’s path and by blowing fast moving air across the blade, by the time any gets to the second chamber (and in practice very little does) it will have lost most of its momentum and will ‘come quietly’ into the second collection point.
Below is the upper dust hood assembly, simply consisting of a single piece of polycarbonate bent and cut to shape, with a hole drilled in it. The connecting tube is an old scrapped vac fitting, which is simply hot melt glued in place.

Here it is, in location under the bandsaw table. It slots into a wooden mount, that doubles as the connection point for the second lower extraction chamber.

To make the lower chamber we used the super drill to hole-saw in the right place. It is not too difficult to go through the sheet steel. Once we have the hole, we can bolt on the wooden mount.

The FE double chamber method: here you can see the lower chamber – a line of old toothbrush heads ‘seal’ off the chamber and help to prevent any dust from being smuggled out in the blade’s teeth (cleaning teeth again – a toothbrush’s work is never done). When the lower door is closed it creates an airlock of sorts in this chamber.

We have had tremendous success with this double chamber method, little to no dust gets through. bearings stay clean and smooth, tyres remain clean and even, wheels remain balanced, vibration and noise is reduced :)
2. Massive sound theory
This is about making a super quiet bandsaw, so before we go any further lets consider a little bit of sound theory to help us along. Attenuating unwanted noise is generally considered in two basic ways: blocking and absorbing[2]. These methods are great, but the thing is that with the bandsaw, we aren’t trying to block airborne sound, as much as prevent the machine itself from sending sound out into the air. It isn’t that practical to make a structurally isolated enclosure round the bandsaw, so we need to look at absorbing vibrations before they can be amplified by the steel frame. In other words we need to ‘deaden’ the sound of the frame, so that when we tap it with a fingernail it doesn’t ‘ring’ the way it does before treatment.
One nice method, used here, tried and tested by by DIY speaker builders, enclosure constructors and audiophiles alike, is to add mass. Sand is a popular and good choice for its wide frequency sound absorbing range (and its price!). We can add sound deadening panels to many parts of the bandsaw with relative ease. Here is an example of one such panel.

So we might have to sacrifice on mobility some (but then how mobile is it really anyway?). Ok so, assuming we might, in the future, want to move the saw, it seems a good idea to build in ‘sand drain plugs’ that can be used if needed. By filling chambers with sand we can help prevent the sheet steel from transmitting the vibrations, and reduce bandsaw noise. With the bandsaw’s wheels removed, we have glued in panels, as pictured, behind which we can fit a centimetre or two of sand.

With the saw unplugged, spin the wheels by hand and listen carefully. If your saw is like ours was, sound will seem to come from everywhere, not just the points that are contacting the moving bits (the blade guides and tyre brush). And yet when the guides and brushes are removed or retracted the noise stops. This tells us that if we want to add mass to prevent vibrations being transmitted everywhere, a good place to start is the source of vibrations.
It is also worth considering the noise during actual sawing. The blade vibrations (the teeth on the wood) can be transmitted through the wheels. Similarly vibrations from other bits can come through the frame into the wheels, and create inaccuracies in cutting… Our upper wheel mount had a convenient little chamber that just needed a little mod to make it prime for sand treatment.

Along with the wheel mount points, an obvious, ready made chamber that is just begging to be sandified, is the main vertical column. On many bandsaws, this is simply a hollow steel section, and while provision for the electric no-volt-release (NVR) switch should be considered, it is quite easy to fill. This is a big volume – so we’re talking super deadening stylee. If you do this, add a drain plug as below: cut a hole in the top, turn the saw upside-down and seal the holes in the base, and then get filling.

We are still in the process of filling ours as we slowly ‘acquire’ sand (it must be dry, to prevent corrosion).

3. Running True
 It should be clear by now that we really don’t want anything but perfectly circular, balanced, vibration free motion with the saw. Many bandsaw wheels and pulleys are hopelessly out of balance and untrue. For silent running we need to address this. Our bandsaw had the once attractive feature of being able to change speeds by adjusting pulleys. In theory this was great, but in practice it made it much louder, due to the unbalanced extra pulley and belt[3].
To identify unbalanced components, start by removing the blade and pulleys, so that you can check the motor. Turn it on without any load attached – the motor should be very quiet. If not, check the mountings are tight, if that’s not the problem, the motor and/or pulley need to be serviced and/or balanced. Once the motor is ticked off, attach the pulley and again run the machine, with just the lower wheel receiving power. There should not be a substantial increase in noise. If there is, check the pulley for wear, correct tension, coplanar alignment, and unevenness. If that’s not the problem it’s time to check the lower wheel for balance.
Rudimentary balance on both bandsaw wheels can be checked/achieved by removing the blade and pulleys, spinning the wheel by hand 5 or more times and marking with a pen the lowest point when it comes to rest. If you notice a trend, keep spinning and marking, until you are satisfied that you have marks in random locations or you have a clearly defined heavy spot (a distinct cluster of marks). You can carefully remove material by drilling a small hole into the wheel. You may already have a number of balancing holes – if so follow their lead, if not consider carefully where to drill, you don’t want to weaken the wheel. Note that this technique only works if your bearings are nice and free spinning (which they should be). There is a slightly more advanced method for dynamic balancing of the bandsaw wheels that requires a micrometer dial gauge [4].
The bandsaw wheels also want to be running as true as possible – any problems with the bandsaw tyres are going to throw things out of kilter. Seemingly small cracks, depressions or holes in the tyre can make a surprising difference. I replaced the tyre shown below, with a new urethane one that supposedly resists deformation better, and it did make a reasonable improvement in noise and cut quality.

To help prevent your tyres from deforming, and therefore keep the wheel true, it is a good idea to de-tension the blade once you have finished using the saw. It is a bit of a pain to have to tension up before each use (modding the handle to make it easier is a good idea – smoothly operating quick release is the ultimate), but well worth it. If your tyre just needs a little ‘true-up’ or ‘re-crowning’, there are various methods: Lonnie Bird, in his Bandsaw Book[5] recommends spinning the wheels and using a sanding block – here the blade is removed because he is presenting the block to the tyre by hand. This means the bottom wheel can be powered by the motor, but you have to find another way to do the top (doing it with the blade fitted is way to dangerous).
We prefer a method documented here on Dan’s blog, ‘Red Fox Tails’, in which you basically construct a wooden jig that attaches to the frame and presents a razor blade (which is used like a scraper) to the tyre. This has the added bonus that as well as smoothing and shaping the surface, the whole wheel can be trued up and made round.

To reduce vibrations while the machine is actually cutting wood it is worth checking the condition of the blade and bearings. Worn or grooved guide bearings will cause all kinds of headaches. For further improvements you could try replacing them with ceramic ones. These have no moving parts and just rely on the slickness and hardness of the ceramic material to support the moving blade. So unlike bearings that can give off a distinctive humming or buzz as they spin round, ceramic ones are claimed to reduce noise. We haven’t tried these as availability in the UK seems poor, and they are several times the cost of standard ball bearing replacements.
We did change to a variable pitch blade – that is, one that doesn’t have a regular number of teeth per inch (tpi), but instead varies, say from 8tpi to 10tpi allong the length of the blade. This has the advantage of reducing noise, because it avoids vibrating at a regular resonant frequency. If you need a new blade anyway, you may as well make it one of these.
Quiet Bandsaw Running Ho!
So after that lot where are we at? Currently the bandsaw is idling at 73-74dB as opposed to the 90dB odd it started at (remember that the Decibel is a logarithmic unit – a reduction of just 6dB is perceived as a halving in volume). During cutting the noise goes up to about 79dB. It is now quiet enough during idling that you can talk over it without too much strain – but loud enough that if you were using it for a long time you would still want ear defenders on (but not three pairs!). We still have things to do on the bandsaw, like filling the rest of the central column. And we are not at ‘quietest‘ status yet (so if you have any other tips please leave them below), but we can bandsaw away, with good results, without fear that we are overly angering our neighbours.
- [1]Engineering noise control: theory and practice, by David A. Bies, Colin H. Hansen, published 1988 by E & FN Spon, London↩
- [2]For many people involved in the attenuation of sound this involves creating partitions or enclosures that are both stiff (so that incoming sound causes minimal vibration to the material, and thus little is transmitted through to the other side); and absorbent (so that rather than just reflecting the sound, the sound energy is absorbed and dispersed as heat). The best strategies often therefore involve using a sandwich of different materials, like open cell foam bonded to steel, for example. The latter being very stiff and a good blocker, the former creating an absorbent surface, that prevents uncontrolled reflection.
Further improvements are made by ‘targeting’ specific frequencies of sound with specific materials that are good at blocking the offending frequencies. With this technique it might be perfectly acceptable that they resonate badly at other frequencies, or might be used in a lamination with other materials so that they offer good transmission losses (reductions in sound) over a large frequency range.↩
- [3]In the end we bought a new belt to go streight from the motor pulley to the lower bandsaw wheel, bypassing the speed adjusting pulley – immediate and massive reduction in noise.↩
- [4]This procedure basically involves running the bandsaw (bottom wheel only, blade removed) with the dial gauge base set up on a solid surface near, but not touching the bandsaw. The indicator should just touch the table so that it can measure the vibrations in the bandsaw. Next, introduce a very small weight to the wheel. This could be anything that will stay on for the short period of time it takes to check the effect it has on vibrations – paper clips, small blobs of blue-tak, or whatever. Keep moving and/or adding the weight and recording the measurements until you have minimised the vibrations showing on the dial indicator. Now you need to drill a few small holes (equivalant to the weight added) on theopposite side of the wheel.↩
- [5]The Bandsaw Book, by Lonnie Bird, published 1999 by The Taunton Press, Newtown, CT.↩
| Tweet |
December 1st, 2010 at 12:06 am
A very interesting post. Thanks for the link to the razor-blade-tyre-truing-tip you mentioned on my blog the other day. ;-)
I’ve always found that thin-gauge blades will greatly reduce vibration on many bandsaws. Sometimes, the widest blades are too much for the frames of modern bandsaws, regardless of what the manufacturers/suppliers may claim… Don’t know who you currently use for your blades but, I would highly recommend Tuff Saws for thin-kerf blades with outstanding performance and customer service:
http://tuffsaws.co.uk/
Your dust extraction mod. looks great and I like some of the ‘deadening’ improvements you’ve made to your saw.
Ceramic guides are hideously expensive. Have you thought of trying wooden guides, if you don’t like bearings? They work on the same principles and, although you should ideally make them from something tough and durable, you could use any scraps you happen to have at hand! They don’t have to be wedge-shaped; you could copy the ‘disc’ pattern of the existing ones. Perhaps even make them slightly elliptical.
I’d still leave the rear thrust bearing in place though, which is the one that makes most of the noise; squealing away as it does…
Olly.
December 1st, 2010 at 10:39 am
Hay Olly, thanks for the blade link, looking forward to the site. I definitely notice an increase in noise and vibration when I switch from my 1/2" to 1" blade (both varipitch). As well as the amount of steel that has to be repeatedly bent and straightened, it may also has to do with the inability of most bandsaws to take wider blades up to the necessary tension...As you say ceramic guides are very pricey, which is somewhat baffling considering their simplicity - I guess a lot of the cost is in the difficulties of manufacturing them to size, being as ceramic is so hard. I know ceramic has been used on the rubbing surface of even fairly cheap hair clippers, for ages... And ceramic ball bearings of course - made me start wondering if you could take out just the ceramic balls and somehow use them as guides.
I have used wooden guide blocks in the past, with decent results. Like you say though the main problem is the big thrust bearing, which can't be replaced with wood as it just gets cut into by the back of the blade.
I have found that improvements can be made, just by 'resurfacing' the main thrust bearing if it has developed any small groves.
Mine had some huge groves cut into it after I planked up this sycamore log:
I had to set the guides so high, that without me realising it, the thrust bearing was touching the steel frame and and not spinning, doh! I thought I was definitely into buying a replacement. But after taking it off the bandsaw, mounting the central spindle in a vice so that the outside could spin freely as usual, it was possible to resurface it really nicely just with a dremel.
January 9th, 2011 at 9:09 pm
Dynamat (or similar) is a sound deadening material that comes in fairly easily cut adhesive sheets normally used by car audio “enthusiasts” — you may know them as the kids who spend more on their car stereo than they did on their car, as well as the hot-rod and custom car folks. It may be possible to adhere a sheet to the inside of your doors and cut down the vibration there as well. I added a couple sheets to the sheet metal doors on my cast iron saw and was greeted with a significant reduction in sound coming from the saw. If you have one of those shops locally, you might even be able to pick up some suitable scraps for free.
January 9th, 2011 at 9:34 pm
Nice tip Brad, thanks!
February 24th, 2011 at 3:38 am
I have been looking for a quite band saw as well and during my travels I found plans to make my own which is SUPPER quite. Check it out!
http://woodgears.ca/bandsaw/homemade.html
March 17th, 2011 at 6:50 pm
Hi,
I read your post on the elektra beckum with interest and will be using some of your techniques on my first bandsaw. But i have a question concerning this machine.
I’m in the process of buying my first bandsaw and the EB Bas 500 is a contender, but i asked around on a forum i’m a member of and i got a reply telling me that it’s quite difficult (practically impossible with the blade on) to adjust the under the table guides. Could you tell me your experience ?
Thanks in advance,
George
March 17th, 2011 at 7:11 pm
Hi George, good question. I don’t find the lower guides impossible, but yes, difficult. Obviously there is no point adjusting them when the blade is off, so you do have to do it with the blade getting in the way somewhat (though that would also be the case on any other bandsaw). The two lower guides are just crude steel guide blocks, which tighten in place with a hex key. So long as you have a hex key small enough, they are not too bad.
Personally, I find one of the hardest things is fixing the lower thrust bearing in place correctly, it has a small knurled plastic handwheel, which tightens to lock the position. I can never get it tight enough, without manoeuvring in some pliers – I should really mod that to be more user friendly…
Are you thinking of getting it new, or second hand? Personally, I wouldn’t go for this one it if I was looking at a new bandsaw – considering the RRP, and some of its failings.
Speed adjustment through a belt system, for example, is always going to be a source of annoying vibration (which is why I ended up tearing mine out). Better to go for one of the new style DC brushless motors that have electronic control if speed adjustment is what is attracting you.
March 17th, 2011 at 9:53 pm
Well i’m going to buy a secondhand bandsaw and these are offered quite frequently where i’m from.
First i thought i might make my own, the one Mathias Wandel designed, but it just seems to much work and i want to do other stuff. And also i read it’s quite tricky to get the guide-post lined up properly. All seems to fiddly to me.
One way around these issues with the below-the-table guides would be to make a new holder for the guide blocks and thrust bearing, but everything facing the right way. This shouldn’t be to hard to make, i’d go for a wood one, i don’t like metalwork much.
March 18th, 2011 at 10:08 am
Mathias Wandel’s stuff is cool, but I have to say, his approach to dust collection on his bandsaw (to simply let it settle inside the saw) seems very primitive to me. Assuming you believe in the health dangers of dust (not very macho, I know, but sane) this just isn’t going to cut it..
A second hand Electra Beckum BS is a nice option if you can pick it up for a reasonable price – that way you feel better about experimenting and modding it – no voiding warranty worries ;) Let us know how you get on – and send a photo if you make an alternative below-the-table guide holder.
October 10th, 2013 at 10:22 am
Thanks for shwring your thoughts about balancing. Regards
October 22nd, 2013 at 8:53 am
Could you please post a closeup picture of the speedchanging diagram (as seen on a picture above) – as it is missing on my new (used) similar bandsaw.
That would really help me, as I have tried to change the speed (the guy who used it before onlye cut in metal)- of course I have tried without the manual, but cant change from slow to fast running, it seems I cant tightend the “band” enough (its like the second band (from “gear” til “drivingwheel” (the one that drives the sawblade) is to small ? when changing from one speed to another), any ideas ?
Best regards
Thomas (Denmark)
October 22nd, 2013 at 6:53 pm
Hi Thomas,
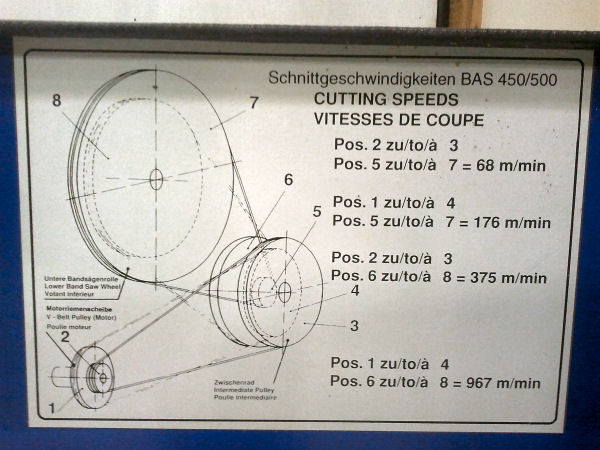
Shame you’re in Denmark or you could come take a look… Hopefully this is what you’re after (click for a bigger pic):
February 19th, 2014 at 12:20 pm
Hi Bongo?
Thanks for the picture, it was excactly what I needed.
Best regards
Thomas
November 24th, 2017 at 8:23 pm
Bongo,
A very interesting article, as is your Dust Sniper Instructable. I made a wooden bandsaw as per Matthias Wandel’s plans and one advantage is that it is very quiet, none of that sheet steel vibrating away.
John
November 24th, 2017 at 10:16 pm
Hi John, thanks, it’s always cool to hear people actually read this stuff :)
Matthias’s bandsaws seem really popular, and builders are usually please. How are you dealing with dust though? I know on some of them it just falls into a draw – which is fine, but ignores all the fine stuff that gets flung all over the shop. I think integrated ‘at source’ collection is the way forward…
July 15th, 2018 at 7:53 pm
I have Electra BAS 505 and if it would be three times as loud as it is, I would not do anything as stupid as you suggest!
Filling the machine with sand to achieve unmeasurably quieter operation is insane!
Sorry, but it is…
November 16th, 2021 at 11:35 pm
Hi All, I have to say that filling the machine frame with sand does sound a good idea that I have not thought of. We stand our bandsaw on a platform made of 50 mm chip foam on floor, 18 mm mdf covered with 6 mm acousticblok (high mass vinyl). Its does seem to prevent or limit vibration going into the floor.
Another idea is was going to test, is to make a acoustiblok velcro attached cover around the large rectangular sections.
I should say that Imbrica, its not stupid sound proofing a bandsaw, is this age of noise nuisance neighbours, its really important to try to prevent complaints BEFORE THEY HAPPEN. Good information on sound proofing can be found from the sound proofing store online.
Kind regards
Paul