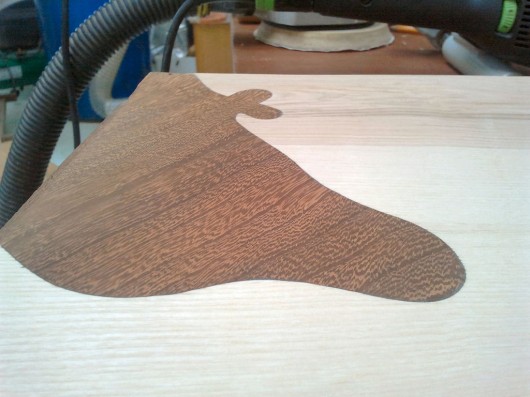
We published this step-by-step Instructable a couple of weeks ago, outlining an unusual woodworking technique to splice interesting shaped pieces of contrasting coloured wood. The Instructable editors featured it on their home page and in their newsletter :) and it’s been getting quite a bit of attention (over 55k views in a week). A bit surprising, given it was an unexpected little diversion in the making of a commission that didn’t originally call for anything like that.
It’s one way to make “cut too short” incidents into an interesting feature and …Continue reading »
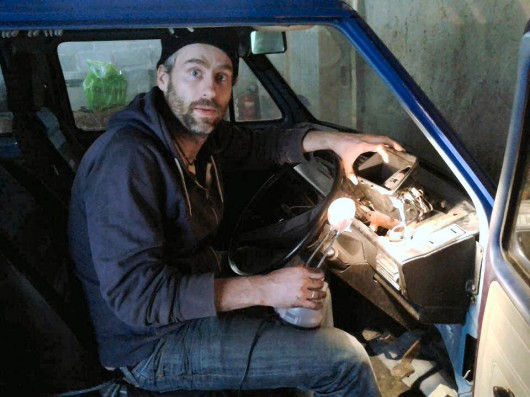
I asked one of a kind maker and Flowering Elbow member, the esteemed Dr Alex Mangold, for an interview.
Alex has been helping us put together the workshop from the early days and has been working on his own project with us for some time. …Continue reading »
We’ve written up an instructable about how we made our conduit-shelf project, which we have been using in the FE workshop for some time. It is basically a weld up of some reclaimed heavy duty metal tubing into a conduit for part of our electrical distribution. The twist is that it doubles as a set of super strong and extendible shelves…
Anyway, it was recently featured on the front page by one of the editors over at Instructables, so check it out!
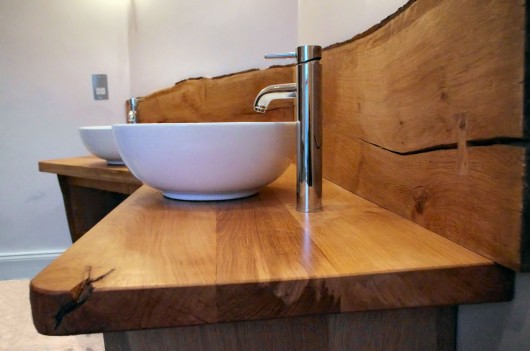
“Take a piece of wood – plane, sand, and oil it, and you will find it a beautiful thing. The more you do to it from then on, the more chance that you will make it worse.” Tage Frid 1979 [1]
So I came across this quote from the late woodworking monster Tage Frid while we were part way through a commission to make an oak washstand and it got me thinking. Partly because we spent a good deal of time selecting different bits of wood we considered would look good for different parts of the piece, and partly because we spent even longer detailing and designing joints.
What is beauty anyway? A question that’s been debated for thousands of years and still gets us going. Over that time, the ‘answer’ to the beauty question has been trending toward three differing attitudes. First, the kinda formulaic ‘objectivist‘ view: beauty is the property of an object that induces pleasure in a perceiver. The objectivist viewpoint says the object is where the beauty’s at – its proportions, complexity, symmetry, contrast, that kind of thing. Plato usually gets …Continue reading »
[1] Frid, T. 1979 Joinery: Tools and Techniques, Taunton Press,Newtown Connecticut.↩
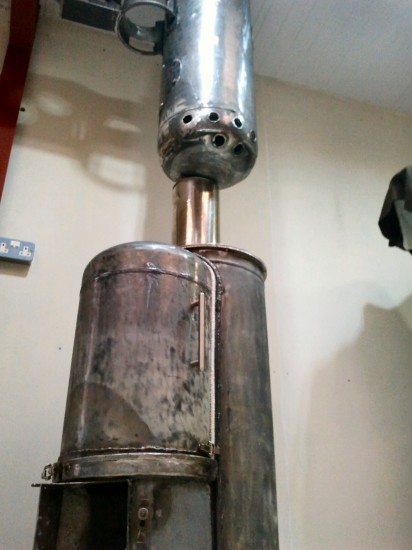
The stove is burning away as we write this, making for a nice cosy workshop :D There have been a few problems though and a number of modifications since we first got it going. Most irksome amongst these was smoke escaping into the shop space – not good. Anyway, we’ll come to that, first lets have a quick look at the finishing bits of the installation. We have some primary and secondary air supply piped in from outside. And we have fiddled about with the injection location of this air a fair bit. In the video below it is as it was when we lit it for the first time.
In the vid you can see the two primary combustion air supply pipes, the one on the left comes from outside, down the secondary combustion chamber (for pre-heating). The smaller pipe on the right comes from the bottom back of the stove and runs through the sideways burn chamber for a little preheating. The problem with the pipes were that …Continue reading »
We have been testing the experimental wood stove and heating the workshop for a while now, but for the sake of completeness and order lets have a look at the heat exchanger build.
Just as a recap on the design: The heat exchanger is a completely separate unit to the burn chamber. That way the burn chamber can be massively insulated – giving a very hot efficient burn. Once that burn is effectively complete we need to get the heat out of the waste gasses and into the room. This is where most …Continue reading »
Winter is here and we finished the plastering of the workshop straw-bale walls before it arrived. It may have taken a little longer than anticipated, but objective achieved :) !
Our big sliding door and the finished strawbale wall with truth window
To put the final nail in that side of things, we’ve written up the whole process, our research and experiences as a ‘make your own’ step-by-step: the Earth and Clay Plastering Guide. Do …Continue reading »
We have begun lining the inside of the wood stove with heat proof insulating materials. The first thing to do was get a good amount of insulation down for the stove floor. For this we used some insulating fire brick type material that came from Dave’s chimney reconstruction. It was a little oddly shaped, so it ended up being a procedure much like stone wall building, using standard fire cement to hold it together.
Then, we popped in some some super C26 graded insulating fire bricks. These are very …Continue reading »